| Table of Contents |
|---|
Installation Prerequisites
- The individual performing this installation has some a small bit of Linux experience.
- Root access is available.
- Internet access is required for installing any missing but required software packages.
- NMIS must be NMIS8 is installed on the same server where that opHA will be is being installed
- NMIS8 is installed in /usr/local/nmis8
- opHA will be installed into /usr/local/omk
- Root access is available (not always needed but much easier)
- Perl 5.10
- RRDtool 1.4.7
- NMIS 8.3.24G or later
- opHA will be installed onto the Master and each Slave NMIS server
Installation Steps
Install opHA Software
This step will be repeated for each NMIS master and slave server
- Copy the opHA tarball to the slave or master NMIS server (a tarball is a GZIP'd tar file, e.g. opHA-1.1.tar.gz)
- You may need to use SCP or FTP to get the file onto the server.
- The file will now likely be in the users home directory.
- opHA will be installed into /usr/local/omk
| Code Block | ||
|---|---|---|
| ||
unalias cp
cd /usr/local
tar xvf ~/opHA-<version>.tar.gz
# NB! If you get a message about timestamps in the future be sure to fix the clock on the server
cd omk/

cp install/nmis/Access.nmis.opha /usr/local/nmis8/install
cp install/nmis/Tables.nmis.opha /usr/local/nmis8/install
cp install/nmis/Table-Nodes.nmis.opha /usr/local/nmis8/conf/Table-Nodes.nmis

cp install/nmis/BusinessServices.nmis /usr/local/nmis8/conf
cp install/nmis/Servers.nmis /usr/local/nmis8/conf
cp install/nmis/Customers.nmis /usr/local/nmis8/conf
cp install/nmis/ServiceStatus.nmis /usr/local/nmis8/conf
cp install/nmis/Tenants.nmis /usr/local/nmis8/conf
cp install/nmis/Table-* /usr/local/nmis8/conf

# Merge your current Access configuration with the opHA access configuration
/usr/local/nmis8/admin/updateconfig.pl /usr/local/omk/install/nmis/Access.nmis.opha /usr/local/nmis8/conf/Access.nmis
/usr/local/nmis8/admin/updateconfig.pl /usr/local/omk/install/nmis/Tables.nmis.opha /usr/local/nmis8/conf/Tables.nmis

/usr/local/nmis8/admin/fixperms.pl

cp install/omkd.init.d /etc/init.d/omkd
cp install/omk-rotate.conf /etc/logrotate.d/
cp install/opCommon.nmis conf/
cp install/users.dat conf/

chown -R nmis:nmis /usr/local/omk

chkconfig --add omkd
service omkd start |
Verify that the daemon is running:
| Code Block |
|---|
root@nmis64 script]# service omkd start
Starting omk daemon:
[root@nmis64 script]# ps aux | grep opmantek
root 14949 1.1 3.0 213880 63504 pts/0 S 07:43 0:00 ./opmantek.pl daemon
root 14952 0.0 0.0 103224 864 pts/0 S+ 07:43 0:00 grep opmantek
[root@nmis64 script]# |
If you do not see the daemon running, try this and look for the reason it is not working (skip this if everything above is fine)
| Code Block |
|---|
cd script
./opmantek.pl daemon
# if that does not give you any errors and runs, CTRL+C and then run
./opmantek.sh
# now grep for the opmantek process again, also check the log files in /usr/local/omk/log |
Verify that the date/time are correct
| Code Block |
|---|
date
# if they are not make sure the timezone is correct and run ntpdate
/etc/init.d/ntpdate start |
Enter License and accept EULA
If the daemon is loaded and the installation has gone well you should now be able to load the opHA GUI, from http://server_name:3000/opHA. This URL should present you with a webpage that allows you to enter a license key and accept a EULA. This step will need to be completed on each opHA instance. After successful license key and EULA acceptance you will be presented with a dashboard that looks like this:

opHA Authentication Model
The opHA daemon is configured with:
- An opHA user and password, by default this is an Apache htpasswd file, defined in /usr/local/omk/conf/users.dat
- The opHA user to use for the authentication, defined per Server in /usr/local/nmis8/conf/Servers.nmis (on the master if they are pulling, for the slaves if they are pushing)
- An IP address list that defines who is allowed to connect to the daemon (depending on the operation a combination of ip address and login credentials is required)
This model enables you to use separate credentials for each slave or the same credentials for each slave, providing for simple configuration, and more secure configuration if required.
opHA Configuration
Server Name for opHA
Server names need to be lower case with no spaces, e.g. NMIS_Server24 is bad, nmis_server24 is good.
Now set the server name in Config.nmis, search for server_name:
| Code Block |
|---|
'server_name' => 'nmis_server24', |
Add Servers to Servers.nmis
opHA supports slaves pushing updates or masters pulling updates (or both). If you want a slave to have the ability to push, it needs to have the servers it should push to in it's Servers.nmis file. Conversely if you want masters to be able to pull they need to have the slaves they should pull from in their Servers.nmis file. At this point it is good to draw yourself a diagram (if you have not already) to aid you in configuring each master and slave.
In addtion: each server (master and slave) needs to have a localhost entry in Servers.nmis which tells the server how to log in to itself.
The Servers nmis file is located at /usr/local/nmis8/conf/Servers.nmis, you will need to add a section for each server the daemon will be connecting to. The NMIS GUI can help you create these entries, to use it load up NMIS on the server you are configuring, and select "System->System Configuration->Servers" from the menu.
The default entries look like this:
- on.
- You will need a license for opHA ( CONTACT US for an evaluation license ).
- opHA has to be installed onto the Primary and each Poller NMIS server.
Preparation
- If you do not yet have a working installation of NMIS in your server, please follow the procedure in the NMIS 8 Installation Guide.
- Download opHA from the Opmantek website.
Installation Steps
Transfer the opHA tarball onto all servers in question, the Primary and all the pollers; either by direct download from the Opmantek website, or from your desktop with scp or sftp or a similar file transfer tool. Repeat the following steps for each involved server:
Become root and unpack the tarball:
Code Block # become root sudo sh # if the tarball was saved in a different location, adjust the following command cd # extract the tarball tar xzf opHA-x86_64-2.1.0.tgzStart the interactive installer and follow its instructions:
Code Block sudo sh cd opHA-2.1.0/ ./installer ++++++++++++++++++++++++++++++++++++++++++++++++++++++ opHA (2.1.0) Installation script ++++++++++++++++++++++++++++++++++++++++++++++++++++++ This installer will install opHA into /usr/local/omk. To select a different installation location please rerun the installer with the -t option. ...- The installer will interactively guide you through the steps of installing opHA. Please make sure to read the on-screen prompts carefully.
- When the installer finishes, opHA is installed into
/usr/local/omk, and the default configuration files are in/usr/local/omk/conf, ready for your initial config adjustments. - A detailed log of the installation process is saved as
/usr/local/omk/install.log, and subsequent upgrades or installations of other Opmantek products will add to that logfile. - For detailed information about the interactive installer please check the Opmantek Installer page.
- a small warning: the installer may warn about two "incorrect checksum detected" for two files, if you install this version on top of the Opmantek Virtual Appliance version 8.5.6G or after other Opmantek applications that were released since opHA 2.1.1. These warnings are benign and you can safely confirm that the installer is allowed to 'overwrite' those files.
Enter License and accept EULA
If the daemon is loaded and the installation has gone well you should now be able to load the opHA GUI, from http://server_name:8042/omk/opHA. This URL should present you with a webpage that allows you to enter a license key and accept a EULA. This step will need to be completed on each opHA instance. After successful license key and EULA acceptance you will be presented with a dashboard that looks like this:
opHA Authentication Model
The opHA daemon is configured with:
- An opHA user and password, by default this is an Apache htpasswd file, defined in
/usr/local/omk/conf/users.dat. - The opHA user to use for the authentication, defined per Server in
/usr/local/nmis8/conf/Servers.nmis(on the Primary if they are pulling, for the pollers if they are pushing) - An IP address list that defines who is allowed to connect to the daemon (depending on the operation a combination of ip address and login credentials is required)
This model enables you to use separate credentials for each poller or the same credentials for each poller, providing for simple configuration, and more secure configuration if required.
opHA Configuration
Server Name for opHA
Server names need to be lower case with no spaces, e.g. NMIS_Server24 is bad, nmis_server24 is good.
Server names need to be names not IP addresses, and should be the hostname not a FQDN, e.g. server NOT server.domain.com
Now set the server name in Config.nmis, search for server_name:
| Code Block |
|---|
'server_name' => 'nmis_server24', |
Add Servers to Servers.nmis
opHA supports pollers pushing updates or Primaries pulling updates (or both). If you want a poller to have the ability to push, it needs to have the servers it should push to in it's Servers.nmis file. Conversely if you want Primaries to be able to pull they need to have the pollers they should pull from in their Servers.nmis file. At this point it is good to draw yourself a diagram (if you have not already) to aid you in configuring each Primary and poller.
In addition: each server (Primary and poller) needs to have a localhost entry in Servers.nmis which tells the server how to log in to itself. NB: it must be 'localhost' in both the key and name portions, 127.0.0.1 will not work!
The Servers nmis file is located at /usr/local/nmis8/conf/Servers.nmis, you will need to add a section for each server the daemon will be connecting to. The NMIS GUI can help you create these entries, to use it load up NMIS on the server you are configuring, and select "System->System Configuration->Servers" from the menu.
Important Notes:
- the name (key) cannot contain / or . and must match what is in the key (which is the first line opening each settings bracket 'key' => {
- if the name refers to an NMIS Poller server, it should match the setting in 'server_name' mentioned above.
- host must be a FQDN if it is not an IP (try using 127.0.0.1 if localhost does not work)
The default entries look like this:
Please read the COMMENTS for each entry CAREFULLY
| Code Block | ||
|---|---|---|
| ||
'key' => {   ### this must match the server_name in Config.nmis on the poller
  'name' => 'key',
# The name of the server- must match server_name in it's Config.nmis file it also what is displayed in the GUI, MUST match key in line above also | ||
| Code Block | ||
| ||
'nmis1' => { 'name' => 'nmis1', # what to name this server in the GUI 'config' => 'Config.nmis', 'protocol' => 'http', # only HTTP is supported at this time 'port' => '30008042', # this should be 3000, the port that omkd runs on, set in opCommon, 'omkd_listen_port' UNLESS CHANGED IT IS 8042 'host' => 'nmis1example.domain.com', # the name/ip address omkd will usehostname used by the opHA process to connect to the server 'portal_protocol' => 'http', # the next entries define how links in the master will appear 'portal_port' => '80', 'portal_host' => 'nmis1.alternate.com', 'cgi_url_base' => '/cgi-nmis8', 'url_base' => '/nmis8',and retreve node and summary data, it will match the nmis_host field in Config.nmis. It must be FQDN or IP and should match the one in Config.nmis, hostname.local might work 'user' => 'nmismst', # the user omkd will connect to this server with 'passwd' => 'C00kb00k' # the password omkd will connect to this server with } |
Edit the entry to look like this, in this example the hostname of the slave is "vali":
| Code Block | ||
|---|---|---|
| ||
'localhost' => { 'name' => 'localhost', 'config' => 'Config.nmis', 'protocol' => 'http', 'host' => 'localhost', 'port' => '3000', 'portal_host' => 'vali.opmantek.com', 'portal 'portal_host' => 'example.domain.com', ## This is the FQDN used to make links to the poller it will match the 'host' entry above UNLESS you are using a proxy service to reach the poller in which case it is the FQDN used to refer to the poller through the proxy. 'portal_port' => '44380', 'portal_protocol' => 'httpshttp', 'cgi_url_base' => '/cgi-nmis8' } |
Edit the entry to look like this, in this example the hostname of the poller is "vali":
| Code Block | ||
|---|---|---|
| ||
'localhost, 'url_base' => '/nmis8',{ 'username' => 'nmislocalhost', 'passwdconfig' => 'nm1888Config.nmis', }, 'valiprotocol' => {'http', 'communityhost' => 'can_be_empty127.0.0.1', 'nameport' => 'vali8042', 'configuser' => 'Config.nmis', 'protocolpasswd' => 'httpnm1888' }, 'portvali' => '3000',{ 'hostname' => 'vali', 'portal_ 'config' => 'Config.nmis', 'protocol' => 'http', 'portal_port' => '808042', 'portal_host' => 'vali.opmantek.com', 'cgi_url_baseuser' => '/cgi-nmis8nmismst', 'url_basepasswd' => '/nmis8C00kb00k', 'userportal_host' => 'nmismstvali.opmantek.com', 'passwdportal_port' => 'C00kb00k80', } 'portal_protocol' => 'http', 'cgi_url_base' => '/cgi-nmis8' } |
There are many options in this configuration but unless you are wanting to change the defaults considerably most of them will not matter. Currently using HTTPS is not supported in the protocol section. You can use different user and passwd permissions here.
If you were presenting the Slave poller and needed to use an alternate connection, e.g. through a reverse proxy for presenting a portal, you would modify the portal_protocol, portal_port and portal_host accordingly.
...
- To add new users see the documentation here for adding users to htpasswd, the htpasswd file for opHA is in /usr/local/omk/conf/
- After you have the users configured you will need to modify /usr/local/omk/conf/opCommon.nmis, find the line "'opha_allowed_ips' => ['127.0.0.1'] and
- Pollers do the following: add the IP addresses of the
- Primary Server(s) that are allowed to connect to the server you are configuring.
- Primary Servers do the following: add the IP addresses of every Poller Server that it will manage.
The ohha_allowed-ips entry contains an array of IP addresses. Each entry must be enclosed with single quotes and separated by commas. Failure to properly format this line will prevent the push/pull of data, although the Test Connection may pass. See the example below:
For example we add them to conf/opCommon.nmis like this:
Primary Server opCommon.nmis setting for "opha_allowed_ips"For example, if we want to allow the servers at 192.168.1.42 and 192.168.2.42 to connect to this server, we add them to conf/opCommon.nmis like this:
| Code Block |
|---|
'opha_allowed_ips' => ['127.0.0.1', '192.168.1.42Poller1IP', '192.168.2.42'],Poller2IP'], |
Poller opCommon.nmis setting for "opha_allowed_ips"
| Code Block |
|---|
'opha_allowed_ips' => ['127.0.0.1', 'Master1IP', 'Master2IP'], |
NB!! : Restart the daemon (NB!! : Restart the daemon (needed after any config change)
...
Load the opHA dashboard (http://server_name:30008042/omk/opHA/) and from the top menu, select "Views -> Servers". You should now be presented with a list of servers that you have configured for this opHA instance. There will be a column with links named "Test Sign In", select the server you would like to test, on successful sign in you will be presented with a page that says "Login Success". If you do not see this you will get an error giving you a hint at what is happening. You can use the logs in /usr/local/omk/log to help you determine what the issue is.
...
IMPORTANT: If the date of either of your servers is not correct you will have an error signing in
Promoting NMIS to be a
...
Primary
By default, an NMIS server operates in standalone mode (which is also slave poller mode), to have NMIS behave in a masterly Primary fashion, you will need to modify the configuration, so you can edit the NMIS Configuration item "severserver_master" using your favourite text editor, edit this line and change from "false" to "true".
| Code Block | ||
|---|---|---|
| ||
'server_master' => 'true', 'nmis_master_poll_cycle' => 'false' # this must be false |
Adding
...
Poller Groups to
...
Primary
On each slave poller you will need to determine which groups are currently in use.
...
This will result in a list of groups which need to be added to the NMIS MasterPrimary, edit /usr/local/nmis8/conf/Config.nmis and add these groups to that list, this is a comma separated list.
| Code Block | ||
|---|---|---|
| ||
'group_list' => 'NMIS8,DataCenter,Branches,Sales,Campus,HeadOffice,HQ,HQDev', |
Limiting Master Group Collection
opHA supports Multi-Master, that means you can have several masters collecting information from the same slaves if required. This could be especially useful if you wanted to have one master with all groups on a slave, and another master with different groups from different slaves, effectively sharing some information between groups.
To do this you use the group property in the Servers.nmis file. Edit the file and add the group property in and a regular expression in for the groups, this will take the form
| Code Block |
|---|
'group' => 'Brisbane|Boston|Saratoga', |
This will match all groups contain the sub-strings, Brisbane, Boston or Saratoga. A complete server entry would look like this.
| Code Block |
|---|
'demo' => {
  'community' => 'secret',
  'name' => 'demo',
  'config' => 'Config',
  'protocol' => 'http',
  'port' => '80',
  'host' => '192.168.1.42',
  'group' => 'Brisbane|Boston|Saratoga',
  'portal_protocol' => 'http',
  'portal_port' => '80',
  'portal_host' => 'demo.dev.opmantek.com',
  'cgi_url_base' => '/cgi-nmis8',
  'url_base' => '/nmis8',
  'user' => 'nmismst',
  'passwd' => 'C00kb00k'
}, |
Test Push/Pull
There are several ways to verify that the transfers are working correctly:
- use the GUI to do a pull or push (http://server_name:3000/opHA/), select the server you want to push to or pull from (or select all to test them all) and press the appropriate button
the output will be a JSON document, with a hash entry for each successful file transfer:
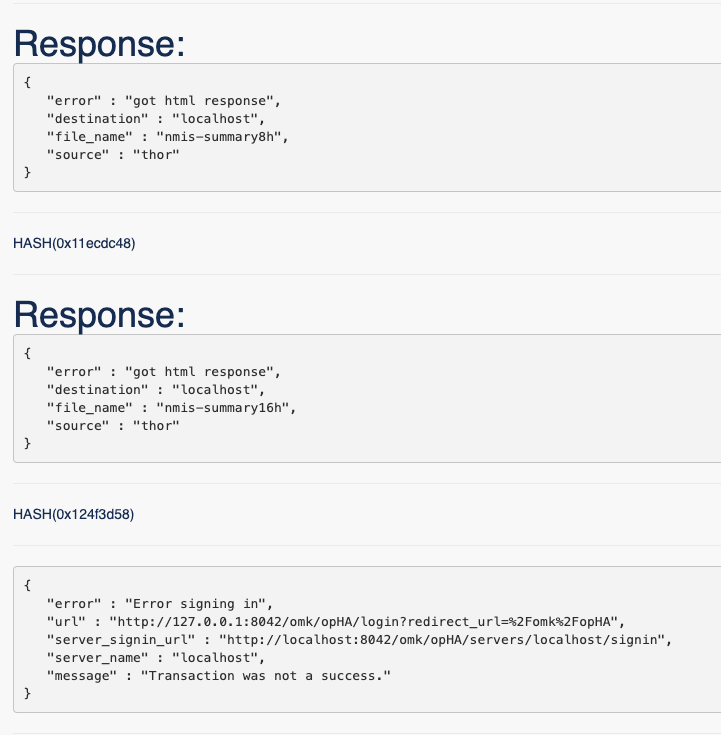
Code Block { source: "vali", success: "Transfer complete", file_name: "nmis-summary8h", destination: "localhost" },On error there will be a hash entry with an error key along with information to help you solve the problem
Code Block { url: "http://vali:443/login", error: "Error signing in", server_signin_url: "http://localhost:3000/opHA/servers/vali/signin", message: "Transaction was not a success.", server_name: "vali" },
- check the logs and watch the transfers happen
- view the list of configured servers and check the "Last Update" column
...
You can also use the admin script /usr/local/nmis8/admin/grouplist.pl on the Primary to find and patch all groups used by all devices imported from the pollers, it can even be added to cron to automate group updates.
Once opHA has succesfully pulled/pushed the devices from poller to Primary you can analyse and patch the groups list by using the following.
| Code Block | ||||||
|---|---|---|---|---|---|---|
| ||||||
# Simply list all found groups so you can add them to 'group_list' => '...'   as above
[root@opmantek ~]# /usr/local/nmis8/admin/grouplist.pl
Branches
DataCenter
IOSXR
NMIS8
The following is the list of groups for the NMIS Config file Config.nmis
'group_list' => 'Branches,DataCenter,NMIS8,IOSXR',
## You can then simply copy this last line to replace the curren line in Config.nmis

### Alternatively the script can automatically update the Config.nmis file's 'group_list' entry for you using the patch=true argument as follows:
/usr/local/nmis8/admin/grouplist.pl patch=true |
Limiting Primary Group Collection
opHA supports Multi-Primary, that means you can have several Primaries collecting information from the same pollers if required. This could be especially useful if you wanted to have one Primary with all groups on a poller, and another Primary with different groups from different pollers, effectively sharing some information between groups.
To do this you use the group property in the Servers.nmis file. Edit the file and add the group property in and a regular expression in for the groups, this will take the form
| Code Block |
|---|
'group' => 'Brisbane|Boston|Saratoga', |
This will match all groups contain the sub-strings, Brisbane, Boston or Saratoga. A complete server entry would look like this.
| Code Block |
|---|
'demo' => {
  'name' => 'demo',
  'config' => 'Config',
  'protocol' => 'http',
  'port' => '8042',
  'host' => '192.168.1.42',
  'group' => 'Brisbane|Boston|Saratoga',
  'user' => 'nmismst',
  'passwd' => 'C00kb00k',
  'portal_host' => 'demo.opmantek.com',
  'portal_port' => '80',
  'portal_protocol' => 'http',
  'cgi_url_base' => '/cgi-nmis8'
}, |
Test Push/Pull
There are several ways to verify that the transfers are working correctly:
- use the GUI to do a pull or push (http://server_name:8042/omk/opHA/), select the server you want to push to or pull from (or select all to test them all) and press the appropriate button
the output will be a JSON document, with a hash entry for each successful file transfer:
Code Block { source: "vali", success: "Transfer complete", file_name: "nmis-summary8h", destination: "localhost" },On error there will be a hash entry with an error key along with information to help you solve the problem
Code Block { url: "http://vali:443/login", error: "Error signing in", server_signin_url: "http://localhost:8042/omk/opHA/servers/vali/signin", message: "Transaction was not a success.", server_name: "vali" },
- check the logs and watch the transfers happen
- view the list of configured servers and check the "Last Update" column
Push/Pull Configurations
opHA allows to change some default connection settings to influence in the connection with the peer.
| Code Block | ||
|---|---|---|
| ||
  'opha' => {
    ...
    'opha_connect_status_expiry_time' => 5,
    'opha_connect_timeout' => 3,
    'opha_inactivity_timeout' => 5,
    'opha_remote_endpoints' => [],
    'opha_request_timeout' => 9,
    'opha_websocket_reconnect_time' => 3
} |
opHA also allow to control the data that we are going to pull/push:
| Code Block | ||
|---|---|---|
| ||
  'opha' => {
    ...
    'opha_transfer_files' => [
      {
        'destination_dir' => 'var',
        'destination_file_name' => '',
        'source_dir' => 'conf',
        'source_file_name' => 'Nodes'
      },
      {
        'destination_dir' => 'var',
        'destination_file_name' => '',
        'source_dir' => 'var',
        'source_file_name' => 'nmis-nodesum'
      },
      {
        'destination_dir' => 'var',
        'destination_file_name' => '',
        'source_dir' => 'var',
        'source_file_name' => 'nmis-summary8h'
      },
      {
        'destination_dir' => 'var',
        'destination_file_name' => '',
        'source_dir' => 'var',
        'source_file_name' => 'nmis-summary16h'
      },
      {
       	'destination_dir' => 'var',
        'destination_file_name' => '',
        'source_dir' => 'var',
        'source_file_name' => 'nmis-event'
      }
    ],
} |
Running a Primary Collection
There are two options to run opHA, using Cron or a as a post process after a NMIS does a collect. Pushes and pulls can be requested from anywhere, if they are requested from the localhost no authentication is required, if they are requested from elsewhere authentication is required.
...
| Code Block |
|---|
'nmis_master_poll_cycle' => 'false', |
To run from cron add this line to the crontab which runs your nmis collections. This to an appropriate file in your /etc/cron.d/ directory (you could create a new one or re-use your nmis file). This line will push or pull (depending on which one you pick) to all servers. If you would only like to push or pull to a specific server replace "all" with the server namea server, for example to server "demo":
| Code Block |
|---|
#### an EXAMPLE to push to a server called demo: |
| Code Block |
*/2 * * * * wget http://localhost:3000/opHA/servers/all/[push|pull] -o /dev/null# all servers */2 * * * * root wget -q http://localhost:3000/opHA/servers/vali/pull -o /dev/null # just pull server vali |
This will get your collections running every 2 minutes regardless of other polling.
To run after an NMIS collect, put a script like this in /usr/local/nmis8/bin/nmis_post_proc.pl
| Code Block |
|---|
package pp; require 5; use strict; sub doPP { system("curl -s8042/omk/opHA/servers/demo/push -O/dev/null #### an EXAMPLE with Pull for one server called Vali */2 * * * * root wget -q http://localhost:30008042/omk/opHA/servers/allvali/pull"); system("wget http://localhost:3000/opHA/servers/all/pull -o /dev/null"); return 1; } -O/dev/null |
This will get your collections running every 2 minutes regardless of any other polling operations.
If you want to run the opHA transfers immediately after an NMIS collect, we recommend that you use the plugin system to hook into the post-collect phase and execute Perl code of your choice then.
Logs
Logs can be found in /usr/local/omk/log or also viewed from the GUI at at http://server_name:30008042/omk/opHA/logs
Troubleshooting
- check the logs in
/usr/local/omk/logs/.check the logs - restart the daemon (required after any config changes)
run daemon from command line and see if the terminal has any helpful errors:
Code Block /usr/local/omk/script/opmantek.pl daemon
Error Signing in For Server localhost
Detailed output:
The configuration nmis8/conf/Servers.nmis is not correct for localhost.
The server doing "pull" needs to have a correct password for the poll server and for localhost. Please verify credentials for localhost server.
Conclusion
After refreshing the web pages on the NMIS Master Primary server you will see the data from the slavespollers.