...
You can also now select "Services" from the node menu bar and see a graph of all the monitored services.

Defining new SNMP based Services to Monitor
This is how to define a new services based on using SNMP for the status of the service.
Step 1
Determine the name of the service you want to monitor, for example to Monitor MongoDB on Windows, the process name is mongod.exe.
...
Click "Add" or "Edit" to save the new service and then you can assign this to a device as described above in "Configuring NMIS Services to Monitor".
Defining new Script based Services to Monitor
This is how to define a new services based on using a script to connect to the socket and send some data, looking for the correct response.
Step 1
Determine the name of the service you want to monitor, for example to is the NMIS web application running.
Step 2 and Step 3
Same as above,
From the NMIS Menu, navigate to "System -> System Configuration -> Services"
Then select add or edit to add a new service or edit an existing service monitoring definition.
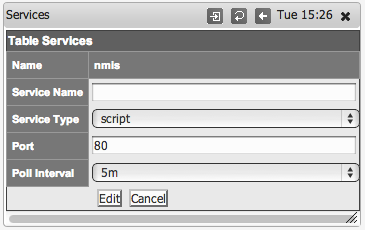
Step 4
Give the service a name, in this example nmis, and it is a script and define the port it will be here port 80.
Step 5
Create a script which will get to the appropriate WEB Application URL, use the basic http service as a basis, the name of the service will be the name of the script
| Code Block |
|---|
cp /usr/local/nmis8/conf/scripts/http /usr/local/nmis8/conf/scripts/nmis |
Then edit that script and change the script to get your URL correctly, in this example the final nmis script looked like this:
| Code Block |
|---|
send: HEAD /nmis8/ HTTP/1.0
send:
expect: 200 OK |
So this script will connect to port 80, send the "HEAD /nmis8/ HTTP/1.0" and a newline, the most basic if HTTP Headers, the response it would get would be:
| Code Block |
|---|
HTTP/1.1 200 OK
Date: Tue, 01 Apr 2014 05:19:19 GMT
Server: Apache/2.2.15 (CentOS)
Last-Modified: Thu, 21 Mar 2013 05:14:21 GMT
ETag: "a233b-67c-4d8686950cd27"
Accept-Ranges: bytes
Content-Length: 1660
Vary: Accept-Encoding
Connection: close
Content-Type: text/html; charset=UTF-8 |
The expect would match the data "200 OK" and declare success. More complex requests could be made here. E.g. checking a database status using HTTP.