...
- Option #1 - Manual configuration
The VM appliance is a normal CentOS 6 system, hence all the mechanisms for network configuration in CentOS are available.
Most specifically you'll be interested in the files/etc/hosts,/etc/sysconfig/network,/etc/sysconfig/iptablesand/etc/sysconfig/network-scripts/ifcfg-eth0. - Option #2 - Use our example network configuration files
Root's home directory contains 2 example network configurations, one for static IP's and one for DHCP. Copy the one you require to
/etc/sysconfig/network-scripts/and edit it to suit:Code Block cp ifcfg-eth0.static /etc/sysconfig/network-scripts/ifcfg-eth0
Now set the IP, netmask, gateway, and DNS if you like ( to add DNS you can add two lines, one for each server: DNS1=ip , DNS2=ip similar to the example below); finally, run
service network restartto activate.Code Block DEVICE="eth0" NM_CONTROLLED="yes" ONBOOT=yes TYPE=Ethernet BOOTPROTO=dhcp DEFROUTE=yes PEERDNS=yes PEERROUTES=yes IPV4_FAILURE_FATAL=yes NAME=eth0 HWADDR=08:00:27:F0:24:96 IPADDR=192.168.0.112 NETMASK=255.255.255.0 GATEWAY=192.168.0.1 DNS1=74.202.226.66 DNS2=74.202.226.65
More information on Enabling a DNS server using the Opmantek Virtual Appliance - Enabling DNS Server on Opmantek VM
- Option #3 - Use the menu-based tool
system-network-config
Simply type insystem-config-networkand follow the prompts.
NOTE: in Opmantek VM appliances before 8.5.12G the tool is not preinstalled and you have to runyum install system-config-network-tuifirst.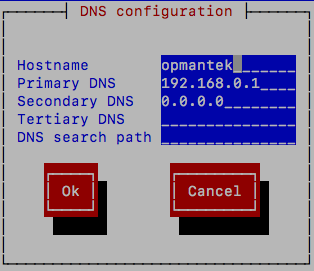
...