The following was the steps required to have opConfig collect data from a MikroTik CHR device.
Before you Begin
Ensure you have access to a device and are able to manually SSH or telnet to it and that you are authorised to do so.
You need to know something about the device you want to add support for, ideally it should already be in NMIS and then you will know a great deal about the device.
We will need to know:
- who the vendor is
- what the operating system is commonly called
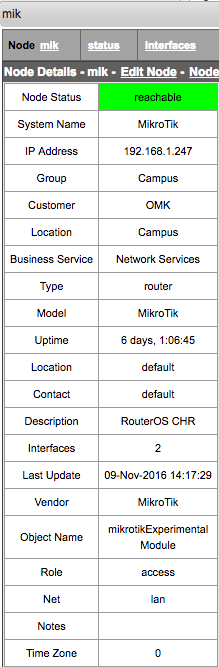
Looking at the node in NMIS will help you here, e.g.
Access the devices
So access the device and see what happens. We are wanting to learn how the device works, so we can teach opConfig how to handle it.
Access using SSH
[keiths@ran mikrotik]$ ssh admin@mik.packsin.com
admin@mik.packsin.com's password:

  MMM      MMM       KKK                          TTTTTTTTTTT      KKK
  MMMM    MMMM       KKK                          TTTTTTTTTTT      KKK
  MMM MMMM MMM  III  KKK  KKK  RRRRRR     OOOOOO      TTT     III  KKK  KKK
  MMM  MM  MMM  III  KKKKK     RRR  RRR  OOO  OOO     TTT     III  KKKKK
  MMM      MMM  III  KKK KKK   RRRRRR    OOO  OOO     TTT     III  KKK KKK
  MMM      MMM  III  KKK  KKK  RRR  RRR   OOOOOO      TTT     III  KKK  KKK
  MikroTik RouterOS 6.38rc19 (c) 1999-2016       http://www.mikrotik.com/
[?]             Gives the list of available commands
command [?]     Gives help on the command and list of arguments
[Tab]           Completes the command/word. If the input is ambiguous,
                a second [Tab] gives possible options
/               Move up to base level
..              Move up one level
/command        Use command at the base level
nov/09/2016 04:15:37 system,error,critical login failure for user admin from 192.
168.1.7 via ssh
nov/09/2016 04:15:37 system,error,critical login failure for user keiths from 192
.168.1.7 via ssh

[admin@MikroTik] >
Access using Telnet
[keiths@ran mikrotik]$ telnet mik
Trying 192.168.1.247...
Connected to mik.
Escape character is '^]'.
MikroTik v6.38rc19 (testing)
Login: admin
Password:

  MMM      MMM       KKK                          TTTTTTTTTTT      KKK
  MMMM    MMMM       KKK                          TTTTTTTTTTT      KKK
  MMM MMMM MMM  III  KKK  KKK  RRRRRR     OOOOOO      TTT     III  KKK  KKK
  MMM  MM  MMM  III  KKKKK     RRR  RRR  OOO  OOO     TTT     III  KKKKK
  MMM      MMM  III  KKK KKK   RRRRRR    OOO  OOO     TTT     III  KKK KKK
  MMM      MMM  III  KKK  KKK  RRR  RRR   OOOOOO      TTT     III  KKK  KKK
  MikroTik RouterOS 6.38rc19 (c) 1999-2016       http://www.mikrotik.com/
[?]             Gives the list of available commands
command [?]     Gives help on the command and list of arguments
[Tab]           Completes the command/word. If the input is ambiguous,
                a second [Tab] gives possible options
/               Move up to base level
..              Move up one level
/command        Use command at the base level

[admin@MikroTik] >
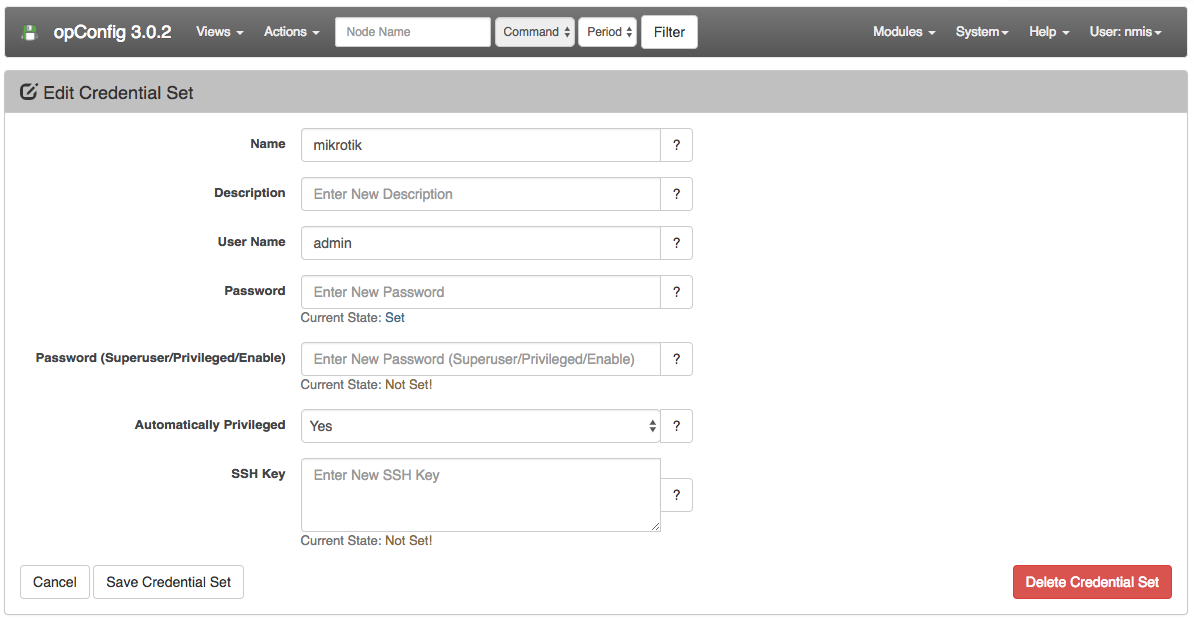
Create a Credential Set based on how you logged in
Now you know how you logged in, create a credential set to match this. To do this navigate to menu -> System -> Edit Credential Sets. What is important to note here is that this device only required a single password and does not use a privileged mode (root in Linux, enable in Cisco). So the new setting (introduced in opConfig 3.0.2), is "Automatically Privileged" for this node this should be set to "Yes".
Create an OS Rule
So that opConfig knows what the OS and other things, you will need to decide a few things, and then create an OS rule which will set these. OS rules enable opConfig to automatically discover what to do with a device.
The file to edit is /usr/local/omk/conf/OS_Rules.nmis, at the end of the base configuration is some documentation, included in the appendix below.
A quick look at the MikroTik device in NMIS showed that the Description field which is the SNMP variable sysDescr was "RouterOS CHR", this will be the basis for our OS Rule for MikroTik devices.
So we will be adding two properties, the OS and the phrasebook, the OS tells opConfig which Command Set to use and the phrasebook tells opConfig how to talk to the router.
	240 =>  {
		'IF' => {
			'sysDescr' => qr/RouterOS/,
		},
		'SET' => {
			'os_info.os' => 'RouterOS',
			'connection_info.personality' => 'routeros',
			BREAK => 'true',
		}
	},
This rule is saying, if I see the regular expression /RouterOS/ match in the field sysDescr, then set the following properties of the node.
Import the node into opConfig
Note:
This feature is not available for opConfig > 4.0.0. As NMIS and opConfig share the same nodes database.
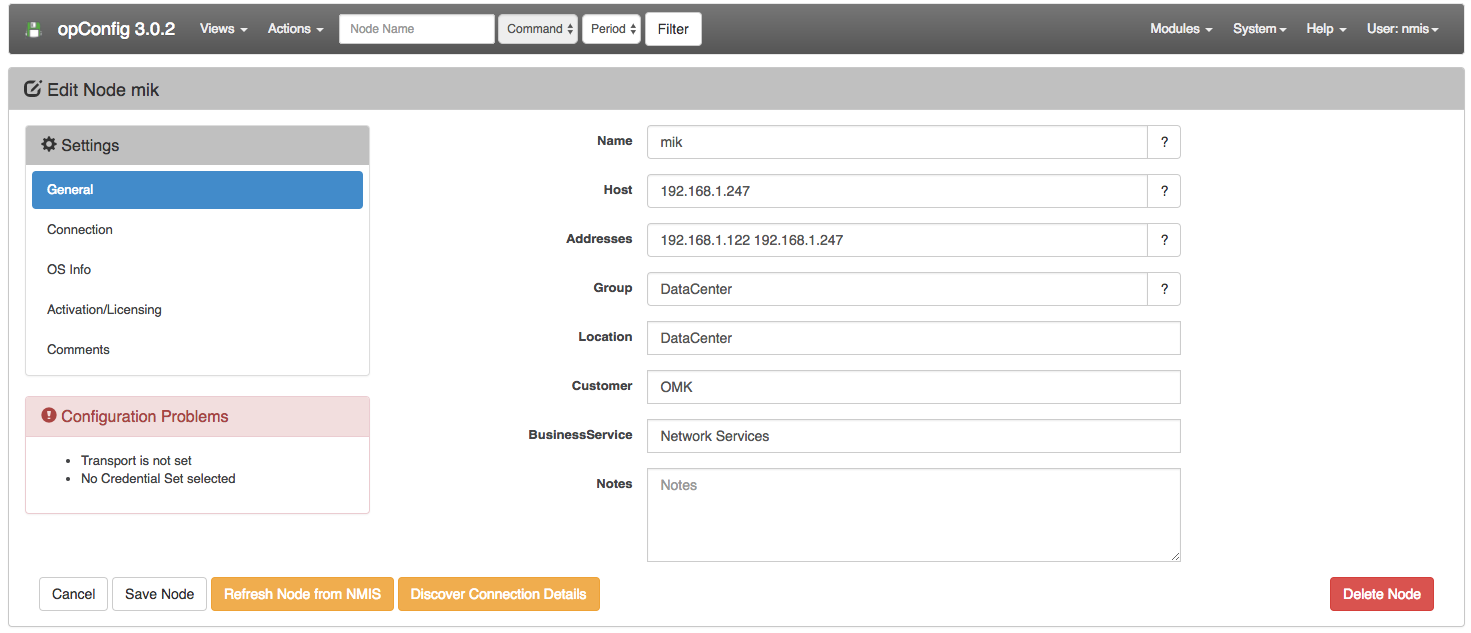
Access the menu in opConfig and import the node, you can do this from the menu "System -> Edit Nodes", then look for the blue button "Import new Nodes from NMIS".
Find the node and edit it in opConfig, you should see a screen like below, this indicates that the OS and personality have been set, you can see them by selecting "Connection" and "OS Info" on the left. If they are not set, you can edit the OS rule and press the "Refresh Node from NMIS" until they are set.
Create a Phrasebook
More information about phrase books: opConfig custom phrasebook and personality
To tell opConfig how to talk to a device, you need a a phrasebook, this is helping the system to know what to do.
Most of the time, devices behave just like Cisco devices, so you can always try the ios phrasebook, but it isn't too hard to create, we learnt by accessing the device that the there could be a "Login:" and "Password:" prompts, depending on how the system is accessed.
The base phrasebook was created in /usr/local/omk/conf/phrasebooks/, a new folder was created mikrotik with a sub directory of routeros, under this a file pb was created, the complete path of the file was /usr/local/omk/conf/phrasebooks/mikrotik/routeros/pb.
prompt user
    match /Login:/
prompt pass
    match /[Pp]assword:/
prompt generic
    match /] > /
macro paging
    send nothing
macro disconnect
    send quit
prompt connection_error
    match /Connection refused|Received disconnect/
More information on creating a Phrasebook can be found HERE: opConfig custom phrasebook and personality
Test the Work So Far
The best way to test everything is to run a discovery on the node, this will match credential set and test the phrasebook, to run that we would run the command:
/usr/local/omk/bin/opconfig-cli.pl act=discover node=mik debug=1
Creating a Command Set
Now you need to create a command set to tell opConfig what to collect from opConfig, this is documented in Managing Command Sets
%hash = (
	'ROUTEROS_DAILY' => {

    'os_info' => {
			'os' => 'RouterOS',
    },

    'scheduling_info' => {
      'run_commands_on_separate_connection' => 'false',
    },

	commands => [
      {
        'tags' => [ 'DAILY', 'configuration','version',
										'troubleshooting', 'detect-change', 'routeros' ],
        'command' => '/export',
        'privileged'  => 'false',
        'multipage' => 'false',
        'run_command_on_separate_connection' => 'false'
      },
      {
        'tags' => [ 'DAILY', 'configuration','version',
										'troubleshooting', 'detect-change', 'routeros' ],
        'command' => '/system license print',
        'privileged'  => 'false',
        'multipage' => 'false',
        'run_command_on_separate_connection' => 'false'
      },
      {
        'tags' => [ 'DAILY', 'configuration','version',
										'troubleshooting', 'detect-change', 'routeros' ],
        'command' => '/system package print',
        'privileged'  => 'false',
        'multipage' => 'false',
        'run_command_on_separate_connection' => 'false'
      },

    ],
  },
);
Appendix A: OS Rules Help Text
# here are some example rules and explanations

	1 => {
		# all IF clauses must match. propnames are in main nodes structure,
		# and subarea.propname will work, too.
		IF => { 'nodeVendor' => qr/.../,
						'sysDescr' => 'some static choice',
						'someotherprop' => [ 'static option 1', 'other static option' ],
						'elsewhere.subprop.subsubprop' => qr/whatever/,
		},

		# propname => what to set it to, totally static
		# all props set that way are a/v to subsequent rules
		SET => { 'os_info.os' => 'set to fixedstring',
						 'connection_info.personality' => 'some other fixed string' },

		# property to consume -> regex -> commasep prop list to fill with captures
		# props captured are also a/v to subsequent rules; use undef as target to skip a capture
		CAPTURE => [
			[ 'sysDescr' => qr/with (capture)(groups)/ => "os_info.platform,os_info.otherthing" ]
			[ 'location' => qr/...(single).../ => "weird.prop.to.set", ],
			# and where evaluation is REQUIRED, but only with a SINGLE target property:
			[ 'thingy' => qr/...(more)than(one).../ => "some.prop" => 'an expression with $1, $2 etc.' ],
		],

		# if set to 1 or 'true', don't consider any other rules
		# if this one already matched. no effect if the rule isn't matching.
		# i don't think this stuff needs to be nested/recursive,
		# but a cheapie overlapping setup would be good and useful:
		# e.g. R1: 'figure out if cisco-ish, don't break', then
		# R20: 'if cisco-ish is true form before, figure out if iosxr and if so, break.'
		BREAK => false,
	},