Escalations
Configuring escalations in NMIS8 happens in two locations. The first location is in System -> System Configuration -> NMIS Configuration area (escalation in the drop down) which stores its settings in Config.nmis. This is where the escalation levels are located. An escalation level links an elapsed amount of time to a name. For example, by default escalate0 happens immediately (0 seconds) escalate1 happens after 300 seconds, and so on. The names and times are configurable.
Escalation actions are configured in System -> System Configuration -> Escalations. This is where NMIS goes to see what should happen when an event is triggered and how it is treated over time.
Escalation Levels
The different levels are described above but they are really a very straight forward mapping of elapsed time to a string key. Here is what they look like by default:

Escalations / Table of Escalations
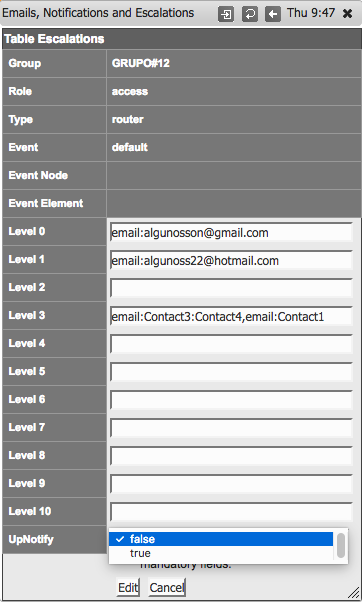
To view the Table of Escalations navigate to Setup -> Emails, Notifications and Escalations as shown below:

This is where things get more interesting. First I will show you the default escalation table that ships with NMIS8, then we will look at it more closely to understand what it is doing.

The entries in this table define notification details for an event: who to notify, how to notify them and when that notification should happen. Any matching line will cause the escalations in that line to be applied. When a column is set as default, any value for that column is considered matching. Let's take a look at the first line which matches all events:

Each of the values for Group, Role, Type and Event are set to default. This means any event that happens in any group in any role of any type will trigger this event. This is a catch-all event, if your network is small and there is a low number of events this could be all you need, if your network is large and creates a lot of events this may end up being useless.
- The Role field is configured when a node is added to NMIS. It may be found in the Nodes.nmis file, look for the roleType attribute.
- The Type field is assigned to a node by the NMIS model that it matches. This value may be found the the /usr/local/nmis8/var/<node-name>-node.json file, look for the nodeType attribute.
Under level0 you can see email:Contact1, above we can see that the elapsed time for escalate0 is 0 so this tells us that Contact1 will be emailed when any event happens.
Under level2 email:Contact1 is again listed, so after 900 seconds of the same event still occurring Contact1 will be emailed again.
Rules can be narrow or wide depending on what groups, roles, device type and event values are given. You can also set a node (or device) name so the rule applies to a specific node, or an Event Element which is an interface. NOTE: the element string in the escalation table will match on any part of the event's element string.
Notification syntax
There are 6 types of notifications that can be added: syslog, json, email, ccopy, pager and netsend.
syslog sends a syslog message to the given syslog server (using the default syslog port 514 and protocol UDP). json saves a dump of the event in JSON format in a new file in /usr/local/nmis8/logs/json.
email and ccopy (Carbon Copy) are almost identical: both send emails to the contact's address, but ccopy has a fixed mail priority of "Normal" and the mail message is slightly different.
Notification lists are comma separated. Each entry consists of an event type, followed by a colon-separated list of Contacts/Workstations/Destinations. Here is an example:
netsend:WKS1:WKS2,email:Contact1,syslog:otherbox.somewhere.com
In this example the notifications of type netsend will go to destinations WKS1 and WKS2, while email notifications will be sent only to Contact1's email address(es). Finally, a syslog message of the event would also be sent to otherbox.somewhere.com.
UpNotify
- When UpNotify is "true", for any "down" message which is sent an UP notification will be sent when the node or element comes up, then lets you know the event is "resolved".
- When set to "false", no notification will be sent when the node or element comes up.
Preventing Escalation/Notification Storms using the NMIS Node Depend Feature
Consider a situation where an edge router goes down, and from the perception of NMIS all the nodes behind it appear to be down. By default nmis would send escalation emails for all the nodes behind the edge router. In order to only have NMIS send the escalation email for the edge router and not the nodes behind it, the 'depend' attribute can be set on the nodes behind the edge router. Setting the depend value to the edge router for the nodes behind it will prevent excess escalation emails.
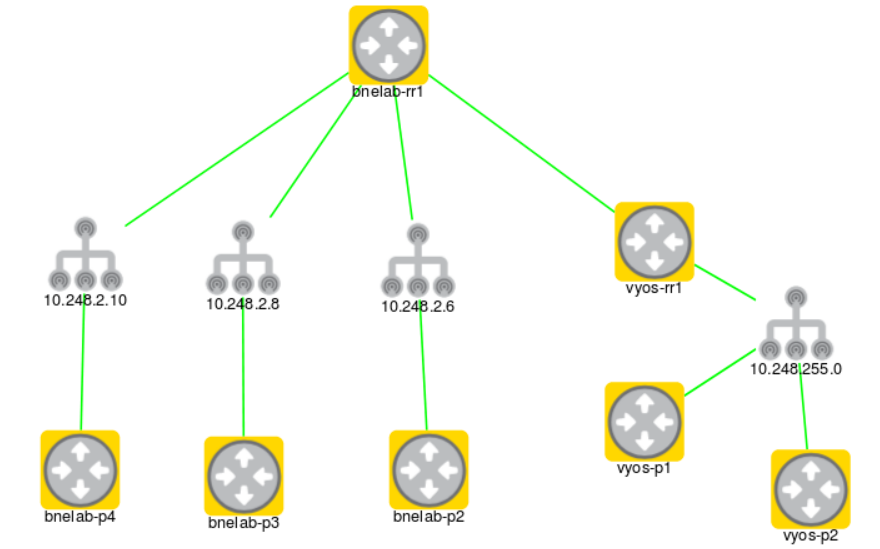
Consider the above topology. If bnelab-rr1 goes down, we don't want escalation emails from the other six nodes. For each of the other 6 nodes we would edit the depend attribute to contain the value of bnelab-rr1.
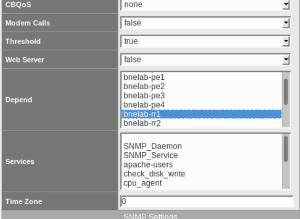
Notice that via the GUI edit node context you can select multiple nodes for the depend value. This may be advantageous if the site has redundant edge routers.