Introduction
To assist with batch node operations, NMIS includes a little script for importing nodes from a CSV file. From version 9.1.1G onwards there are also more fine-grained tools available, which are described on the page titled Node Administration Tools.
Important
IMPORTANT: The import_nodes.pl script was updated on 10 Dec 2020 to better handle node activation which was causing problems with nodes. If you are using this tool you should update from the NMIS9 GitHub repository, the links are below.
The bulk import script can be found in /usr/local/nmis9/admin/import_nodes.pl and there is a sample CSV file /usr/local/nmis9/admin/samples/import_nodes_sample.csv.
The minimum properties you need to have to add a device to NMIS are, name, host, group, role, community, roleType and netType. Technically you can use defaults for group and role and the name and host maybe the same, so the absolute minimum is host and community. This sample CSV includes the full five properties and if required you can use additional ones.
Use the activated.XXX field to activate for NMIS, opConfig, opEvents, you can activate for NMIS but not opConfig for example.
name,host,group,role,community,netType,roleType,activated.NMIS,activated.opConfig
import_test1,127.0.0.1,Branches,core,nmisGig8,lan,default,1,1
import_test2,127.0.0.1,Sales,core,nmisGig8,lan,default,1,1
import_test3,127.0.0.1,DataCenter,core,nmisGig8,lan,default,1,1
newnode,127.0.0.1,DataCenter,core,nmisGig8,lan,default,1,0
To load these devices into NMIS9 run the following command:
nmis9/admin$ ./import_nodes.pl csv=/usr/local/nmis9/admin/import_nodes_sample.csv simulate=f/t
This will take the CSV file and will look for the existence of the node based on the name/node_uuid. If the node exists, it will override its properties for the properties specified in the csv.
Simulation mode
By default, NMIS will be run in simulation mode. At the end, you will able to see if the node will be created or update. As an example output:
UPDATE: node=newnode host=127.0.0.1 group=DataCenter
	=> Node newnode not saved. Simulation mode.
ADDING: node=import_test3 host=127.0.0.1 group=DataCenter
	=> Node import_test3 not saved. Simulation mode.
ADDING: node=import_test1 host=127.0.0.1 group=Branches
	=> Node import_test1 not saved. Simulation mode.
ADDING: node=import_test2 host=127.0.0.1 group=Sales
	=> Node import_test2 not saved. Simulation mode.
If you are ready to run the command and apply this changes into NMIS, you should use simulate=f. As an example output:
UPDATE: node=newnode host=127.0.0.1 group=DataCenter
	=> Successfully updated node newnode.
ADDING: node=import_test3 host=127.0.0.1 group=DataCenter
	=> Successfully created node import_test3.
ADDING: node=import_test1 host=127.0.0.1 group=Branches
	=> Successfully created node import_test1.
ADDING: node=import_test2 host=127.0.0.1 group=Sales
	=> Successfully created node import_test2.
Once you have added nodes or modified nodes an NMIS Update is required which you can run for all nodes or run for a single node or simply leave it until the next scheduled update for that node is due (default every 24 hrs).
If you are running an update for all nodes it may take a while to complete. The following command shows how force an update for one node at a time (a good way to distribute the load). You can also schedule an update for all nodes by removing the job.node argument.
./bin/nmis-cli act=schedule job.type=update at="now + 5 minutes" job.node=testnode job.force=1
To run an NMIS update for a single node, optionally with debug which will result in debug files in /tmp/
./bin/nmis-cli act=schedule job.type=update at="now + 5 minutes" job.node=testnode job.force=1 job.verbosity=9
If adding a large number of devices it might take sometime to complete the adding. This is because the first time a node is added to NMIS it needs to create all the RRD files for performance data, this only takes a few seconds per file, but each node may have 10 RRD files or more, so this compounds to a large number of seconds very fast when adding 1000's of devices at a time.
Performance
You can check how long the script is going to last for each node using the following argument:
nmis9/admin$ ./import_nodes.pl csv=/usr/local/nmis9/admin/import.csv time=1
The output show be something like:
0.00 Begin
0.00 Loading the Import Nodes from /usr/local/nmis9/admin/import.csv
  done in 0.00

0.00 Processing nodes
0.00 Processing newnode
UPDATE: node=newnode host=127.0.0.1 group=DataCenter
	=> Successfully updated node newnode.
0.00 Processing newnode end
0.00 Processing import_test2
UPDATE: node=import_test2 host=127.0.0.1 group=Sales
	=> Successfully updated node import_test2.
0.00 Processing import_test2 end
0.00 Processing import_test3
UPDATE: node=import_test3 host=127.0.0.1 group=DataCenter
	=> Successfully updated node import_test3.
0.01 Processing import_test3 end
0.01 Processing import_test1
UPDATE: node=import_test1 host=127.0.0.1 group=Branches
	=> Successfully updated node import_test1.
0.01 Processing import_test1 end
0.01 End processing nodes
Import nodes from the primary into the pollers (opHA)
We can use the primary to import nodes to the pollers, indicating the cluster_id in the header:
name,host,group,role,community,netType,roleType,activated.NMIS,activated.opConfig,cluster_id
import_test1,127.0.0.1,Branches,core,nmisGig8,lan,default,1,1,a515c63a-0d11-4bcb-a402-39a4600aebb9
The cluster_id can be checked:
- Using opha-cli tool:
/usr/local/omk/bin/opha-cli.pl act=list_peers
cluster_id id server_name status
a515c63a-0d11-4bcb-a402-39a4600aebb9 614f3ea8626660a3e47f4801 poller1 save
In the opHA GUI:
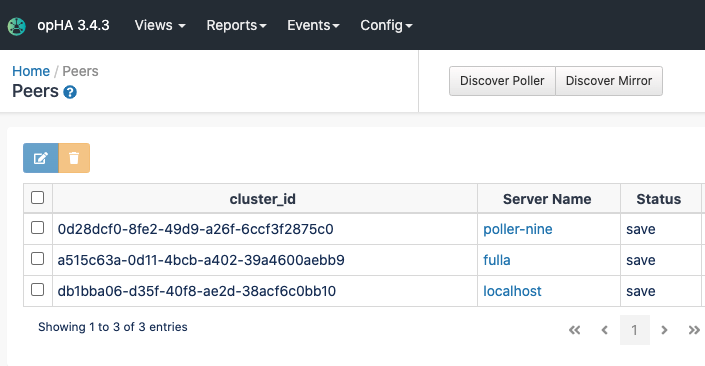
The nodes will be transferred when the opha cron job runs, it can be called manually:
/usr/local/omk/bin/opha-cli.pl act=sync-all-nodes
More information in the opHA documentation opHA 3 Redundant Node Polling and Centralised Node Management#Managingremotenodes