...
Setting Default Attributes
To use Discovery , first a few default attributes should be setwe require access credentuials on the target devices. Go to Open-AudIT Enterprise -> Menu -> System Discover -> Open-AudIT Discovery Configuration.
The single most important attribute to set the the "default_network_address" attribute. This is used for Discovery so that when we send an audit script to a remote machine we can also provide the URL of the Open-AudIT server for the remote machine to send it's data back to. We set this manually because your Open-AudIT server may have multiple network addresses. Rather than try and work out the correct address, we ask you to complete this step manually so there can be no mistakes.
You should also set the following fields:
- default_ipmi_username
- default_ipmi_password
- default_snmp_community
- default_ssh_username
- default_ssh_password
- default_windows_username
- default_windows_domain
- default_windows_password
Credentials -> Create Credentials and create credentials for all the types of devices you have. They may be for Windows, SSH (Linux / OSX / etc), SNMP, etc.
Once these have been completed you can go to Open-AudIT Enterprise -> Menu -> Views -> Discovery.
Discovery Form
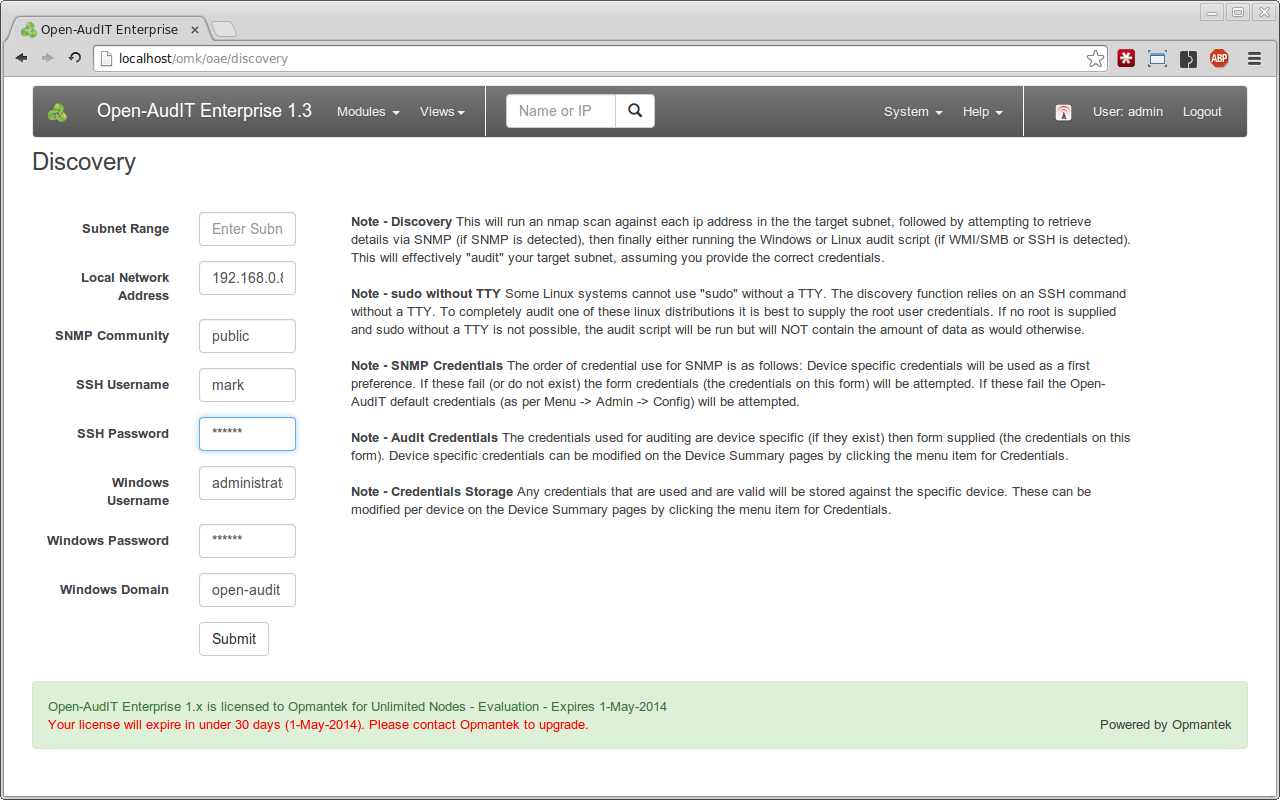
This form will pre-populate with your defaults (which you have just configured), but you can also override them with specific attributes for any given Discovery run.
If you provide a subnet in the form 192.168.0.0/24 (note the slash) a network Group will be created if one does not exist. If you do not wish a network group to be created, you can specify a subnet range using dashes. IE - 192.168.0.0-255.
Fill the form details and click the Submit button.
Results
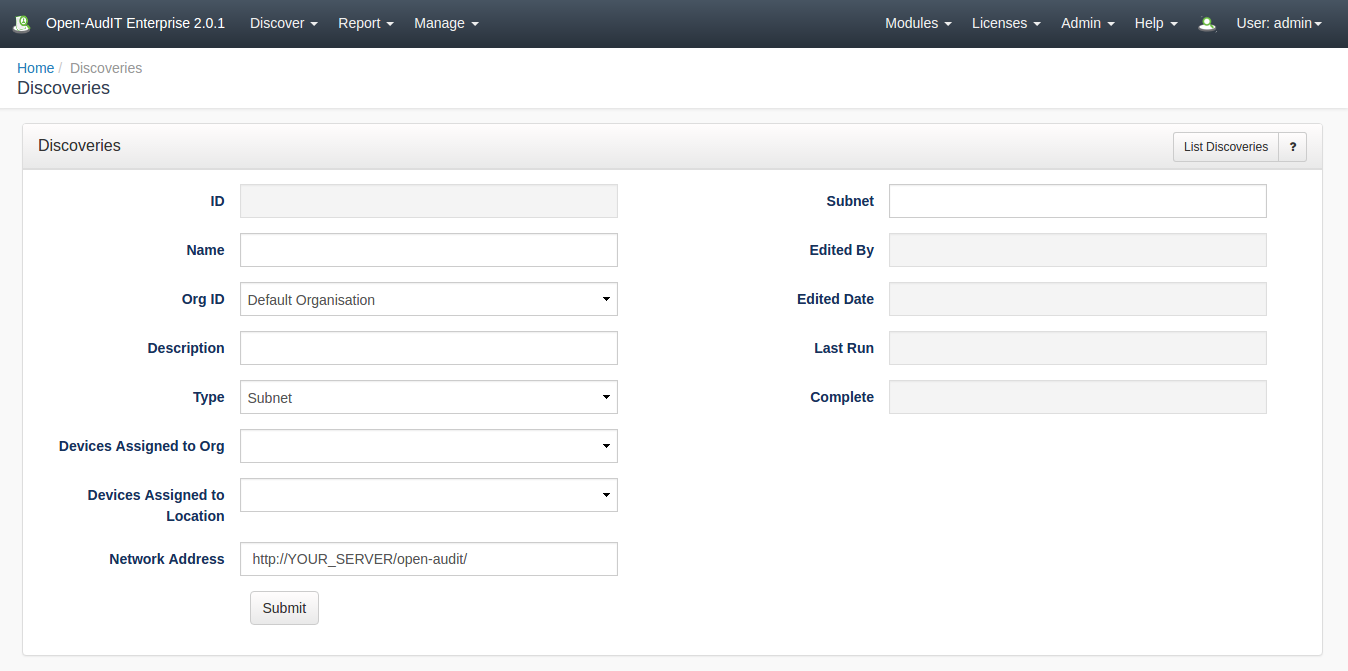
to Menu -> Discover -> Discoveries -> Create Discoveries.
If you have set the "Local Network Address" in the config (Menu -> Admin -> Community -> Discovery Configuration) the Network Address will be pre-populated. This should be the URL of your Open-Audit server. You can use HTTPS if preferred (and you have installed a SSL certificate).
Add the IP address of the target computer.
Click the "Submit" button and you will be directed to the Discovery list page. Click the Execute button and the Discovery will start and you will be directed to the Discovery details You will be redirected to the Logging page. You can refresh this page and to see the progress log output of the Discovery run. Note that the first log may take a short while if the script has to determine if a number of target devices are active on a large subnet range.audit being performed.
Once the initial list of target devices has been obtained you should see details of each target as it is scanned and input into Open-AudIT.
Logging
NOTE - The logging can be quite verbose so there is now a feature to purge the log file at Open-AudIT -> Menu -> Admin -> Logs -> Purge Log.
You can set the log level in the configuration (menu -> System > Open-AudIT Basic Configuration). By default it is set to 5, but you may wish to temporarily increase it to 7 for debugging purposes.
You should see logging similar to the below (if set to level 7). In the below instance, a Discovery run was performed on 192.168.0.1-5 and the device at 192.168.0.1 was found and SNMP scanned.
| No Format |
|---|
Feb 26 10:55:21 mark 24798 C:discovery F:process_subnet Completed processing 192.168.0.1.
Feb 26 10:55:21 mark 24798 C:discovery F:process_subnet SNMP credential update for 192.168.0.1 (System ID 21).
Feb 26 10:55:21 mark 24798 C:discovery F:process_subnet SNMP update for 192.168.0.1 (System ID 21).
Feb 26 10:55:21 mark 24798 H:snmp_helper F:get_snmp 192.168.0.1 SNMP v2c scanned.
Feb 26 10:55:21 mark 24798 C:discovery F:process_subnet Attempting SNMP discovery on 192.168.0.1.
Feb 26 10:55:21 mark 24798 C:discovery F:process_subnet SSH Status: false 192.168.0.1.
Feb 26 10:55:21 mark 24798 C:discovery F:process_subnet SNMP Status: true 192.168.0.1.
Feb 26 10:55:21 mark 24798 C:discovery F:process_subnet WMI Status: false 192.168.0.1.
Feb 26 10:55:16 mark 24798 C:discovery F:process_subnet Start processing 192.168.0.1.
Feb 26 10:55:16 mark 14993 S:discover_subnet U:www-data Scanning ip address 192.168.0.2
Feb 26 10:55:16 mark 14993 S:discover_subnet U:www-data Submitting online 192.168.0.1
Feb 26 10:55:13 mark 14993 S:discover_subnet U:www-data Scanning ip address 192.168.0.1
Feb 26 10:55:13 mark 14993 S:discover_subnet U:www-data Discovery for 192.168.0.1-5 submitted at 2014-02-26 10:55:13 starting
Feb 26 10:55:13 mark 27630 C:discovery F:discover_subnet U:Administrator Discovery submitted for 192.168.0.1-5. |
As devices are discovered you should see them appear in the relevant Groups.
Discovery Form
NOTE - If a Windows or Linux machine is discovered (as opposed to audited with a script) and is not currently in the database, you will likely first see a very limited set of information. This will be only the Nmap and maybe the SNMP data. After the actual audit script has been run and processed you should see the complete details about the device.
You can provide subnet ranges in any format that Nmap will accept (not including options). As above, if you provide a range that includes the / character, a network Group network item will be created if none exists and all devices found will be included in that group.
How Does it Work
A simple BPMN diagram is below to help illustrate the basic process.
...
Discovery Form and Nmap Script
When you submit execute the required details on the Discovery web form, the Open-AudIT server initiates a script and returns control to the web interface - hence no waiting for the scripts to complete before the web interface is again available. The initial script uses Nmap to first ping scan the entire range and store stores the responding ip IP addresses. Then each responding ip IP address is scanned to determine basic information and if the ports for WMI, SSH and SNMP are active (also ports for http, https and telnet - but these are not used at present). The individual data per ip address iIPaddress is sent to the Open-AudIT server.
...
The Open-AudIT server processes the data and if SNMP is open attempts to scan the device. The SNMP scan will attempt to connect to the device using stored credentials in the following order: device specific credentials (which must be existing in the database), credentials provided via the Discovery web form and finally the default Open-AudIT credentials as per the configurationstored credentials. If any of these work, they are stored against the individual device for subsequent Discovery runs.
Once the SNMP scan has been performed (or not), the data about the device is used to attempt to determine if the device already exists within Open-AudIT. If so it is updated, if not a new device is inserted. A note of the internal system id is made for the next section.
IPMI Scan
Open-AudIT when running on a Linux server with ipmitool installed can query the IPMI interface (used as a remote access card in servers, sometimes called an ILO card). If you have credentials set, very basic information can be retrieved. This is only available on Linux based Open-AudIT servers.
Windows Audit
If WMI is open on the target device and the Open-AudIT server is running Windows, an attempt is made to directly audit the device using the Discovery form supplied credentials. The device id from above is also passed to the audit script. When the audit is complete, it is sent to the Open-AudIT server for processing.
...
If SSH is open on the target device and the target device is running Linux (at the moment, support for OSX and AIX is in the works), AIX, OSX, Solaris or ESXi, the audit script is copied to the target device and a processes is started so the device "audits itself". The device id from above is also passed to the audit script. When the audit is complete, it is sent to the Open-AudIT server for processing.
...
NOTE - When auditing a Linux device via SSH, some Linux distributions do not allow sudo commands to be passed without a TTY (which we are doing). To completely audit one of these linux distributions it is best to supply the root user credentials. If no root is supplied and sudo without a TTY is not possible, the audit script will be run but will not contain the amount of data as would otherwise. Subsequent audits using root (or run locally using sudo) will therefore provide extra details about the system and generate several "alertschanges".
NOTE - You will need the ports for WMI on the Windows firewall opened on each target Windows computer. For Windows Core servers, ensure you allow the firewall connections as per - http://blogs.technet.com/b/brad_rutkowski/archive/2007/10/22/unable-to-remotely-manage-a-server-core-machine-mmc-wmi-device-manager.aspx
...