Introduction
So you've downloaded a virtual appliance from https://opmantek.com/network-tools-download/ and now you want to set it up and take it for a test drive to see how NMIS and the Opmantek networking modules can help you administer your network. No problem. Easy.
- Unzip the virtual appliance file
- Use the OVF (Open Virtualization Format) file (VMware and VirtualBox examples provided)
- Fire up the new VM and set the IP address
- Load NMIS in your browser
Let's assume you've got step 1 under control (unzipping) and move to step 2.
Using the OVF file
After unzipping the file you should see a folder with a structure like this:
Because the file is in an open format it should be recognized by your virtualization software or by a conversion tool provided by your virtualization software.
VMware
I will cover two options for VMware software. Both of these options require the VMware OVF Tool, see here for some links or hit up google or vmware's site. From now on I'll assume you have it installed and know where it is
Convert OVF to VMX
mkdir NMIS8
ovftool NMIS8-OVF/NMIS8.ovf NMIS8/NMIS8.vmx
You should now be able to import/load the vmx file with your VMware software and skip to step 3.
Transfer OVF to ESXi
ovftool --name="NMIS" -dm="thin" -ds=datastore_number ./NMIS8-OVF/NMIS8.ovf vi://user:password@host_ip_address
Remember to set the name you like, the datastore you want and point it at the server you want to deploy to
VirtualBox
VirtualBox will import directly from an OVF file so you can just fire up VirtualBox and select "Import Appliance..."
Browse to where you unzipped the file and select the ovf file
Select the file, you should see a screen something like this:
It should be safe to Import. The import process took a couple of minutes to complete, just enough time to grab a cup of coffee I'd say.
If you have any trouble the VirtualBox documentation is here: https://www.virtualbox.org/manual/ch01.html#ovf
Fire up the VM and set the IP Address
At this point the VM has DHCP enabled so the easiest way to access it is from the VM software terminal. We will set the IP so we can easily login from any terminal. So go ahead and boot the VM, after the VM is finished booting you will be welcomed by a login prompt, login:
User: root
Password: NM1$88
Root's home directory contains 2 example network configurations, one for static IP's and one for DHCP. Copy the one you require (because we already have dhcp enabled the example sets up a static IP address):
cp ifcfg-eth0.static /etc/sysconfig/network-scripts/ifcfg-eth0
Now set the IP, netmask, gateway, and DNS if you like ( to add DNS you can add two lines, one for each server: DNS1=ip , DNS2=ip)
Alternately
You could also install a text based UI to help you:
yum install netconfig
# after installation complete:
system-config-network
Load NMIS in your browser
Open your favourite web browser and navigate to:
http://vm_ip_address/cgi-nmis8/nmiscgi.pl
User: nmis
Password: nm1888
Configuring Modules
The first step to using a module is knowing how to open it, the next is to get a license for it. This process is simple and painless, if you would just like to try the software trial licenses are available!
Before you begin we will make sure all the permissions are correct so everything goes smoothly, this is very important:
/usr/local/opmantek/bin/opfixperms.pl
Should produce the following output:
opfixperms.pl Version 1.0
Copyright (C) 2012 Opmantek Limited (www.opmantek.com)
This program comes with ABSOLUTELY NO WARRANTY;
See www.opmantek.com or email contact@opmantek.com
This script will fix the permissions for Opmantek based on the configuration /usr/local/opmantek/bin/../conf/opCommon.nmis
The directory to be processed is: /usr/local/opmantek
The user will be set to: nmis
The group will be set to: nmis
Now let's get started!
Opening a module
There are two ways to open the modules, by using the drop-down in the NMIS page (make sure you do not have pop-up's blocked for this page):
or by manually entering the url into your browser:
http://vm_ip_address/cgi-omk/opFlow.pl
Getting a trial license
opFlow, opMaps and opReports will present you with a page that looks like the following when not registered:
You will now need to get a license key and enter it into the licensing system, the easiest way to do this is by clicking "View and Entere Licenses" button. This will open a new tab/page containing the opLicensing module. On this page you will again need to click a button, it's time to choose if you want a trial license or if you would like to buy a license.
This will bring you to https://opmantek.com/trial, select the products you would like to try and click "Get Trials". If you are not logged in you will need to do so now, you can join our community if you haven't already done so by clicking the "Join Now!" link in the login window.
After logging in and clicking "Get Trials" you should see a page notifying you that you have sucessfully added a trial to your account. To activate a license for a module click the "Activate" button for that module.
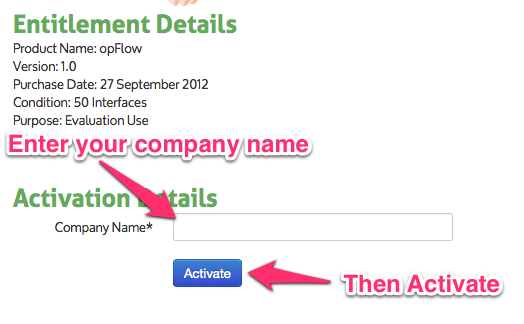
Enter your company name and then select "Activate"
You will now be presented with your license key for the product you selected. You will now want to select the key text (right click -> select all) and copy it to the clipboard (right click on selected text -> copy)
Now it's time to return to the opLicense tab and click "Enter a License Key"
Paste the license key into the textbox provided and click "Add License". IMPORTANT: before you click "Add License" make sure you have done this step:
/usr/local/opmantek/bin/opfixperms.pl
You should now have a sucessfully installed key!
Now return to the tab/window of the module you were activating and click "License Entered, Continue"
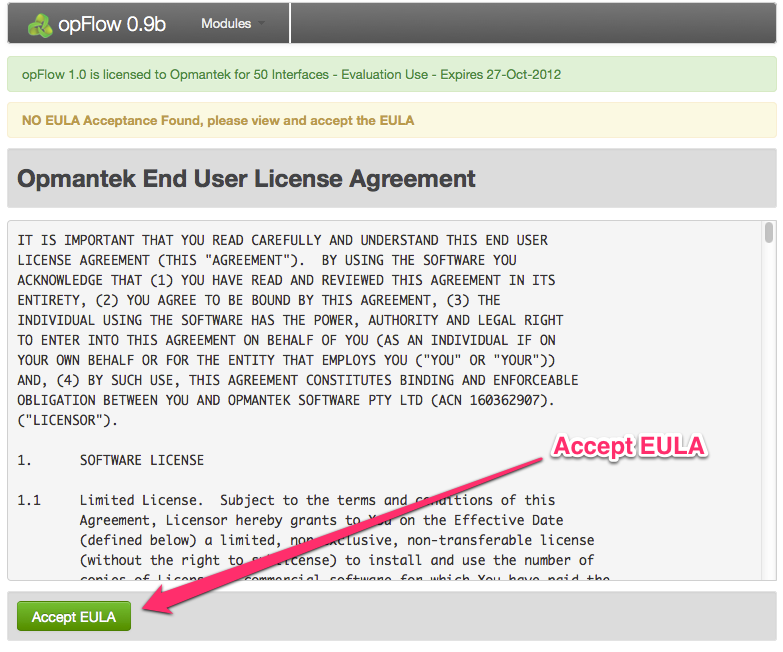
Accept the EULA:
And you're Done! The next step is to make sure the configuration for the module you activated is correct & complete.
opFlow Configuration
Mongo
The first step to get opFlow working is to start the mongo database. The VM already has mongo installed and all the scripts are ready to go, first we will add the mongo script to the VM's startup routine, and then we will start the daemon.
chkconfig mongod on
service mongod start
Note: the first time you start mongo it may take a while to return to the command prompt, don't worry about it, just let mongo run and it will eventually come back, if it doesn't CTRL+C and start it again.
Flowd
flowd should be running, but to be sure we will take the same steps as we did with mongo.
chkconfig flowd on
service flowd start
When you run the start command you will likely see an error like the following which tells you it's already running, of course you could always use ps to find out as well
Starting flowd: bind: Address already in use
Listener setup of [0.0.0.0]:12345 failed
opFlowd
opflowd also needs the same treatment:
chkconfig opflowd on
service opflowd start
Configure your Cisco Router
I will discuss a very basic configuration.
On the interface you want to collect flow traffic from, add:
ip flow ingress
ip flow egress
Now that you have an interface setup to gather netflow information you have to tell the router to send it somewhere:
ip flow-export version 9
# replace the ip address in the following line with your VM's ip address
ip flow-export destination 192.168.0.10 12345
If you enable that configuration netflow traffic should now be sent to your VM.
By default netflow will send information about flows after they are finished, if you would like to see information more often you can set the flow-cache timeout, in minutes, so this will send flow info every minute (see the docs for more details):
ip flow-cache timeout active 1
Run setup script
./opflow_setup.pl setup=all
opFlow will now be displaying your data! Visit http://vm_ip_address/cgi-omk/opFlow.pl and take a look! (also make sure you have a license)
ps. Authentication info for Opmantek modules is the same as it is for NMIS, the default is:
username: nmis
password: nm1888
For more information and help with opFlow see it's community homepage


