The default configuration that NMIS8 ships with can be turned into a working system fairly, if you are looking to get NMIS8 set-up quickly and just want the basics to start off with, this is the guide for you, if you are looking for more in-depth descriptions see NMIS8 Configuration.
Groups
It is often advantageous to group individual nodes, or devices, into Groups to improve dashboard views and reporting. This is especially important when working with opMaps, as it allows geographical notification of group status, reducing the number of icons being represented.
While NMIS ships with a set of default Groups built-in, most users will want to add custom groupings. Groups are single level and cannot be nested. Therefore, it is imperative some thought and consideration be given to the creation of groups and assignment of nodes. If you plan to use opMaps you should consider creating Groups based on specific geographic location. Otherwise, Group definition is most often defined by device type (Routers, switches, etc), business function (core, perimeter, offsite, etc), or manufacturer (Cisco, Juniper, etc).
Σ - To help with monitoring and troubleshooting make sure you have a dedicated group to contain your primary or Master NMIS server and any additional critical nodes. NMIS ships with the default NMIS8 Group
Group definitions are contained in the NMIS config file - config.nmis - but this can be edited through the NMIS interface by selecting Setup > Add/Edit Groups from the NMIS menu.

The Add/Edit Groups window Allows direct editing of the group_list field from the config.nmis file.
NOTE: The group list should contain NO SPACES; this includes between group names comprised of multiple words (use an underscore _ ), or following the group name.
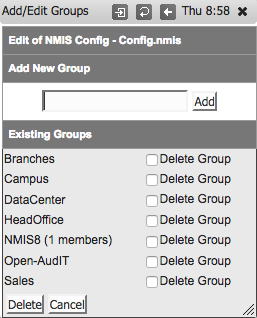
Once you have completed adding your group, click the Add button to confirm or Cancel to close the dialog. The NMIS Configuration window will open, centered on the group_list, to allow you to confirm the change. When you are satisfied simply close this window.
For more on Groups: NMIS8 Groups
Add/Edit Nodes and Devices
There are two basic ways to monitor a node, using SNMP or using ping. Each node requires, at a minimum, 4 attributes to be set in order for it to be monitored.
Σ - You should always add your NMIS server as the first device to be monitored. This will ensure you receive status reports regarding the health of the monitoring systems themselves. If you split databases across servers make sure to add those devices as well, and any nodes that connect the web server and the database server(s) together. These nodes should them be grouped into a NMIS specific Group.
Adding a node (minimum requirements)
Each node requires, at a minimum, 4 attributes to be set. These are marked with a red asterisk next to the properties name, and are the first four properties in the Add/Edit Nodes and Devices window.
- From the NMIS Menu select System > Add/Edit Nodes and Devices
- Enter a name for the new node, note: NO SPACES IN THE NAME, caps are OK
- Enter an IP address or resolvable name for the device
- Select the appropriate value for "Group",
- Enter the SNMP Community * string; this defaults to "public", but may be customized in your network
- Under Extra Options
- Select the appropriate value for "Net Type" (wan or lan)
- Select the appropriate value for "Role Type" (core, distribution, or access
- Select one of the two options below to either monitor by Ping or SNMP
* The “SNMP Community string” is like a user id or password that allows access to a router's or other device's statistics. SNMP Community strings are used only by devices which support SNMPv1 and SNMPv2c protocol. If the community string is correct, the device responds with the requested information. If the community string is incorrect, the device simply discards the request and does not respond. By convention, most SNMPv1-v2c equipment ships from the factory with a read-only community string set to "public".
Setting a node to monitor by Ping Only
- Under the Advanced Options section, set "Collect" to "false"
- Scroll to the botton and click "Add and Update Node"
- You should now be able to find your device on the main NMIS8 page, selecting the device should show the node status as reachable, type as generic and model as PingOnly
Setting a node to monitor by SNMP
- Under the Advanced Options section, ensure "Collect" is set to "true"
- Set the "SNMP Community" column to the community string for that daemon, if you don't have one then it's time to make one up or use NMIS' default "nmisGig8"
- Scroll to the botton and click "Add and Update Node"
- Ensure your device is running an SNMP Daemon service that will allow the community string you specified access
- If SNMP is not configured you will likely see the Node Status as degraded and an Event that says "SNMP Down - SNMP error, Escalate 0, active", if you configured the email you will now also have an email in your inbox regarding the problem
Node Customization (Optional)
This is the section about Node Customization
System Configuration
This is the section about System Configuration
Emails, Notifications and Escalations
Contacts
The default contact is named Contact1 and should be left with this name. We need to set the email address, and phone numbers if you like.
- System -> System Configuration -> Contacts
- Click "edit" on the Contact1 line
- Do not change the name, leave it as Contact1
- Set your email address, and other fields if you like
- Click the "edit" button to save
- To test the email run the command <nmis_base>/admin/testemail.pl
By default NMIS8 has the user Contact1 notified on all events for the first couple of escalation levels (0 and 2), because we set the email address for Contact1 emails will start to flow immediately, no changes need to be made. After you receive the first couple of messages you may find yourself wanting to make some modifications to the default settings, see INSERT LINK HERE.
Conclusion
For more detailed information on any of these topics or any other topics that are not covered here see NMIS8 Configuration