The device discovery and auditing function of Open-AudIT is designed to work "out of the box" as much as possible with the default settings. However, each user's environment is different and sometimes adjustments to Open-AudIT's configuration, network security settings, or credential sets need to be completed in order for accurate audits to complete.
This guide will walk you through troubleshooting the most common problems reported by Open-AudIT users.
Problems Starting Your First Audit
If you are having trouble getting your first audit started, it is best to attempt to audit a single, known machine with proper credentials before moving on to full subnets of devices. Start with this guide below on how to audit a single machine.
First, make sure you've configured your devices properly: Target Client Configuration
Next, disable Blessed Subnets to test if this security feature is inhibiting the audit from running or adding a device to the dB: Blessed Subnets
Finally, run a discovery on a single device (not on a subnet) to help identify and focus troubleshooting efforts: How to discover a single Device
Limited Data Returning From Audit
Please read through all of these steps first, then return back to the top and complete them one at a time.
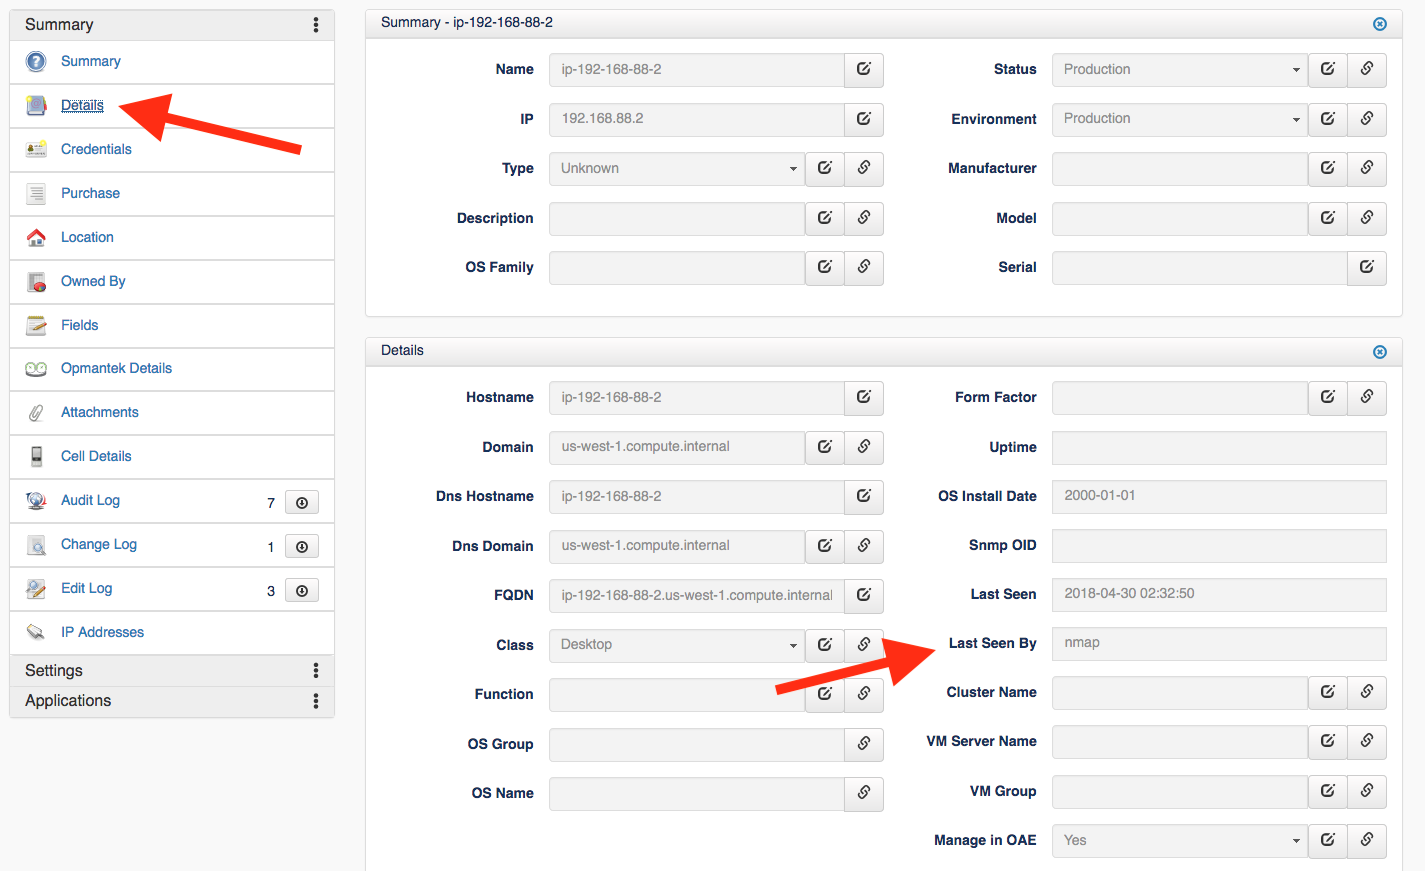
Step 1 - First, determine if a detailed audit is being completed or only the initial results of the NMAP scan. The easiest way to do this is to run a Device report; select Report -> Hardware -> Device from the Open-AudIT menu, then select the device by clicking the blue View button in the left-hand column of the report. This will display the Device Details screen.
Step 2 - Now, click Details from the menu on the left under Summary. This will open the Details on the right side under the Summary panel. You should look for the Last Seen By field, depending on the version of Open-AudIT and type of device this may include NMAP, SNMP, or Audit. If it says NMAP, as the screen shot below, then a full audit has not been completed on this device. The next steps is to determine required ports are open, then if any of the supplied credential set(s) were accepted by the device.
Step 3 - Before continuing you should increase the log-level and rerun the audit on the device. This will give you in-depth debugging information that will help you determine exactly what went wrong during the audit. To adjust the log_level select Admin -> Configuration -> All from the Open-AudIT menu. Find the entry for log_level, which defaults to 5, and increase it to 7. This change will take effect immediately and detailed debug information will be captured during the next audit.
Step 4 - Now that you have adjusted the log_level to 7 and re-run an audit on the device you need to check the Discovery Log to see what happened. First, return to the Device Details screen as you did in Step 1 above. Then, select Discovery Log from the menu on the left. The discovery log, along with other logs and information open up below the Summary panel.
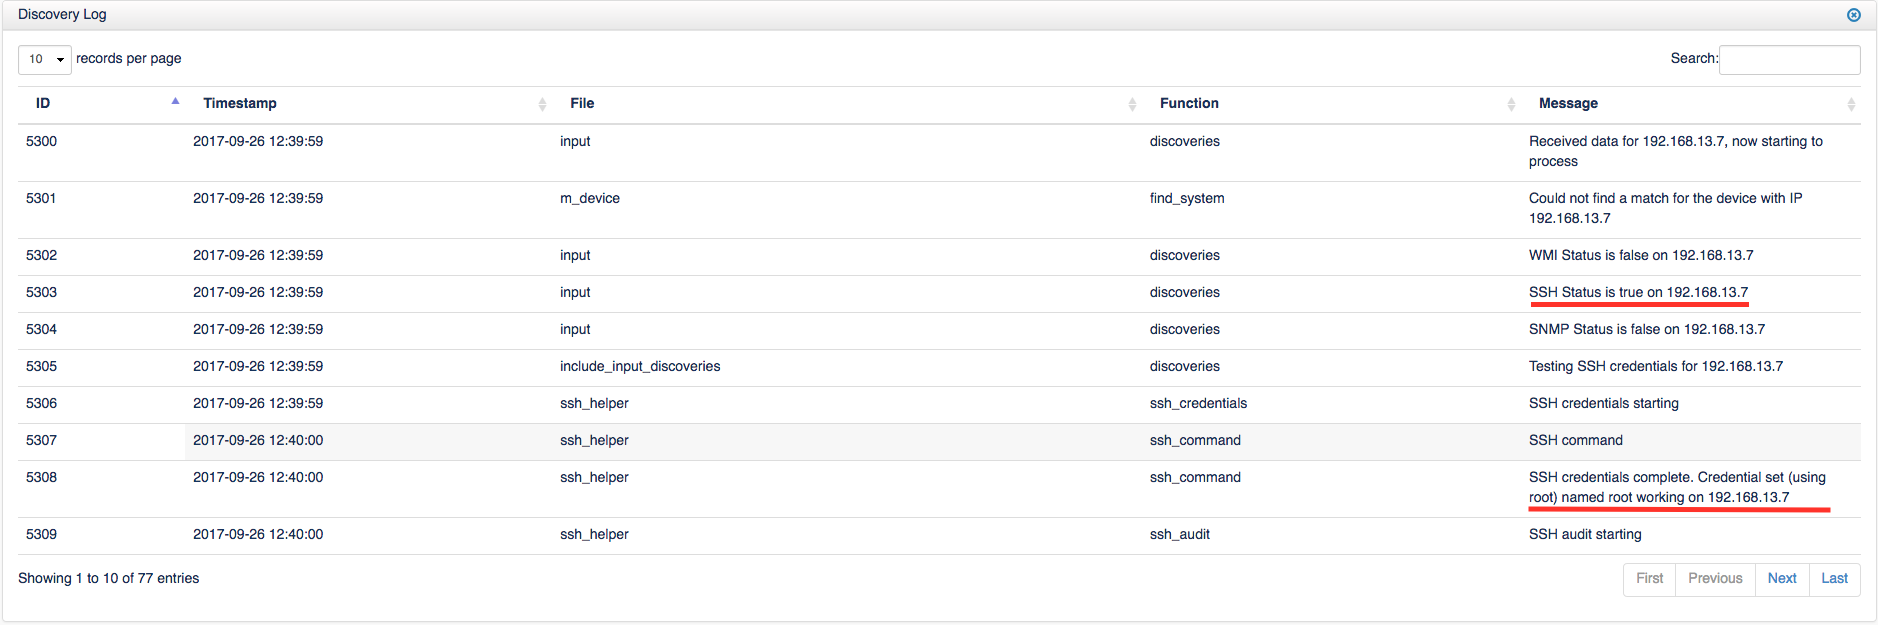
As shown in the image above, this example is using SSH credential set. SSH is typically used on Linux devices, WMI is used by Windows machines, and SNMP is used for network devices, Linux and Windows devices. More information on credentials and configuration can be found here: Target Client Configuration. The first underline in the image above is showing that SSH Status suggesting the SSH port is open. Notice WMI Status is shown as false as well as SNMP, if a device was using those forms of credentials then the Status should be true.
Ensure which ever credential type you are using is displaying the Status as true, otherwise the audit will not successfully complete. The second underlined part of this image is confirming that the credential set is working for this device and then continues below to show that the SSH audit is starting. Check the discovery log for this information after auditing your device to see if the credentials are being accepted with no issues.
Step 5 - What if you've done all this and the audit just never seems to find a device at an IP address you know is legitimate?
If you run a discovery and, for whatever reason, Open-AudIT doesn't add the device to the database there wont be a direct way to view the Discovery log (Step 4 above). However,three will still be entries in the discovery_log table, you'll just need to dig them out the the database to look through them. To export the discovery logs select Admin -> Database -> List Tables from the Open-Audit menu, then look for the discovery_log table. Click the blue details icon to access the table, then click Export to CSV. This should create a CSV file that can be opened in a text editor or Excel. Search for the device's IP address and look through the related entries to determine what Open-AudIT found and what decisions it made regarding the device.
Step 6 - The Device is in the Discovery_log, but the audit ends right after the port check
Open-AudIT runs an Nmap discovery on each target IP address. Open-AudIT scans the Nmap top 1000 TCP ports, as well as UDP 62078 (Apple IOS) and UDP 161 (SNMP). For Open-AudIT to consider a target IP to have a device responding, any of the Nmap Top 1000 TCP Ports must be responding or the UDP 62078.
At this point we need to double-check the information NMAP is receiving from the device. Open a command/terminal window on the Open-AudIT server and execute this command (The -F argument is a fast scan of the first 100 ports of the device, the IP is the IP address or FQDN of the device not responding) -
nmap -F IP
[root@myserver:~]# nmap -F 192.168.0.10

Starting Nmap 7.40 ( https://nmap.org ) at 2018-10-16 13:27 UTC
Nmap scan report for targetdevice (192.168.0.10)
Host is up (0.18s latency).
Not shown: 94 closed ports
PORT     STATE SERVICE
22/tcp   open  ssh
80/tcp   open  http
111/tcp  open  rpcbind
443/tcp  open  https
514/tcp  open  shell
3306/tcp open  mysql
If the NMAP scan returns NO OPEN PORTS then the problem is configuration of the target device.
Step 7 - A target that responds to UDP 161 (SNMP) only and NO other ports (TCP or UDP 62078 / 161) is not considered to be responding.
Why do we not consider a UDP port 161 response enough? Because it is very common for firewalls separating network segments to respond with UDP 161 for a target IP regardless of there being an actual device present at that IP address.
UDP port 161 Workaround
Duplicate Devices, Missing Devices, and Devices Being Overwritten
When Open-AudIT receives data about a device, either by discovering the device during an audit run or by the user importing the device, it must determine if this discovered device matches a device that already exists within its database, or if it is a new device that should be added. Open-AudIT uses a series of twelve property matches to determine this.
The Match Rules work as OR comparisons, not AND. This means the first rule that matches a field in the discovered device to one in the dB resolves as an existing device. All Matching Rules have to fail in order for a device to be new and result in a new record being created. If any of these properties do not match, then a new device entry will be created, which could result in duplicate device entries. In situations where properties are duplicated, for example a dbus_id is copied during a VM clone, then an existing device may incorrectly get overwritten/updated rather then a new entry being created resulting in missing devices.
You can check the Discovery Log (see Step 4 above) for your device to see which field was matched on.
Guides for adjusting the matching rules are covered in detail HERE: Matching Devices
Discovery Stopped Working
If you are running a RedHat or CentOS system and you have upgraded Nmap or went to a previous version sometimes it is necessary to reset the SUID on the binary. You can do this by running the following command:
chmod u+s /usr/bin/nmap
User attempted to view a resource which does not exist error

This notification typically occurs when discovering a single device. When a single device discovery is completed Open-AudIT automatically deletes the discovery. If the page is refreshed Open-AudIT wont have a resource to load, and will return you to the Dashboard with this error.
Your first step should be to check and see if the device was audited and added (or updated) in Open-AudIT. If the device was not found or updated you should check the discovery logs to determine why. To check the discovery logs in Open-AudIT navigate to menu -> Admin -> Database -> List Tables and look for discovery_log and click the blue details icon next to it. At this point export the file to CSV and you should be able to find your device entry there.