Network Management Information System (NMIS) is very powerful for sending out custom notifications to people who want to be notified about specific things. For example if a network manager wanted to be notified when a specific interface on a specific router or switch was down, you could configure this as an escalation. The following will describe how to configure NMIS Contacts and Escalations to do this.
Determine Node and Interface in NMIS
Using the NMIS GUI, find the node, then when viewing the node select "interfaces" or "active intf" to view the interfaces. Please note NMIS will only send notifications for interfaces which are "active" that means NMIS is managing the interface and when "Event on" is equal to true.
We need the interface name, in this example from a NetGear 24 port switch, it has an odd and long name, "Slot: 0 Port: 21 Gigabit - Level", will will need this exact text.

Create a Contact for the Escalation
Create a new contact or edit an existing contact, access the contacts from the NMIS Menu "System -> System Configuration -> Contacts", click on Add or Edit.
Fill in the Contact, Email address at a minimum, in the example below, DutyTime is configured for 24x7 emails, you can also configure this for Business Hours, which would be "08:18:MonTueWedThuFri" for example. This means that emails will only be sent during those times. The other very powerful option is the Level field, here I am saying only send events to this contact which are Fatal or Critical or Major or Normal, alternately I could include all the levels which would be "(Fatal|Critical|Major|Minor|Warning|Normal)". The level for Normal is so that Up Notifications can be set.
More details about configuring Contacts can be found here: NMIS8 Contacts

Create an Escalation to receive Email Notifications
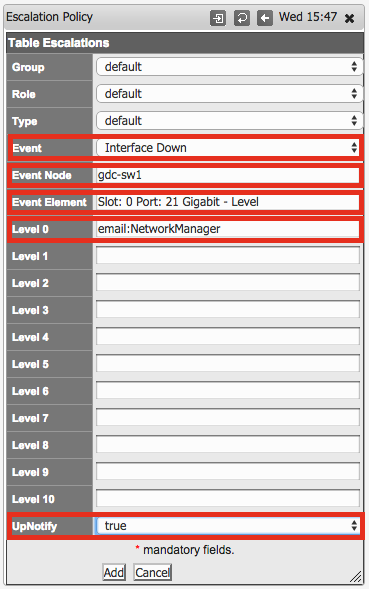
Create a new escalation policy access the escalations from the NMIS Menu "System -> System Configuration -> Escalation Policy", click on Add.
Configure:
- the Event by selecting "Interface Down" from the list.
- Event Node to be the name of the router or switch. Node name can be a regular expression and will match ignore case sensitive.
- The Event Element to be the name of the interface you saved earlier, in this example "Slot: 0 Port: 21 Gigabit - Level". Event Element can be a regular expression and will match ignore case sensitive. There is a known bug in NMIS 8.6.8, where elements with "/" are not processed correctly. In this case, a regular expression should be used. This bug will be fixed in the next release.
- Set the escalation Level you require, in this case it is set to Level 0, which means send the notification straight away, setting it to Level 1 would wait for by default 300 seconds (5 minutes) before sending the email, if the interface was to come up within 300 seconds, the event would close and no notification would be sent.
- Lastly the UpNotify has been configured to true which means an email will be sent when the interface comes up again.
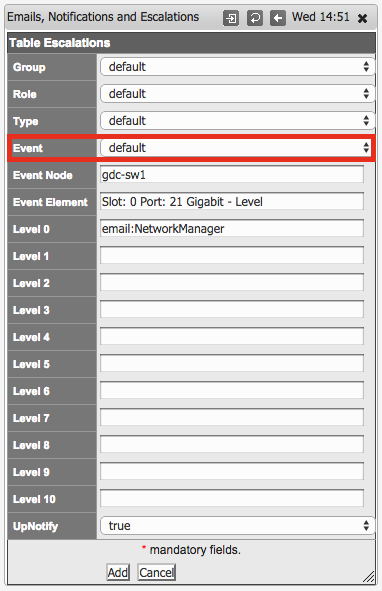
Receiving Less Specific Events
If the manager wanted to receive ANY event associated to this element, the element being the Interface on this node, then you can leave the Event field configured as "default" and any event NMIS generates for this interface will be sent to the manager, like Interface Utilisation, Error Packets, Discarded Packets, etc.
Resulting Logs in the NMIS Event Log
When all this is configured, and the interface goes down, easily tested on my switch here, you will see an event for the Interface Down in the NMIS event log as well as a log entry letting you know an email was sent and who it was sent to.
