NMIS8 includes powerful capabilities for performance and operational thresholding. These thresholds have very granular controls which by default have been configured fairly broadly. A simple example of this is that you will likely what to be notified when the CPU is high on a Core device, vs an Access switch in Timbuktu. This is part of the NMIS idea of relevance of information in general.
About Threshold Controls
Simple Thresholds
In NMIS a simple threshold is defined by the following:
- the name
- the event name
- a select (with a default and optionally more)
- default threshold values
In the file /usr/local/nmis8/models/Common-thresholds.nmis this looks like this:
'cpu' => {
  'item' => 'avgBusy5min',
  'event' => 'Proactive CPU',
  'select' => {
    'default' => {
      'value' => {
        'critical' => '70',
        'fatal' => '80',
        'minor' => '50',
        'warning' => '40',
        'major' => '60'
      }
    }
  }
},
Have a set of thresholds for Core CPU
- 'critical' => '60',
- 'fatal' => '70',
- 'minor' => '40',
- 'warning' => '30',
- 'major' => '50'
Advanced Thresholds with Controls
- $name
- $node
- $host
- $group
- $roleType
- $nodeModel
- $nodeType
- $nodeVendor
- $sysDescr
- $sysObjectName
- others for interface
- Almost unlimited possibilities.
So we can create a more specific threshold for core devices (NMIS has this already configured by default).
'cpu' => {
  'item' => 'avgBusy5min',
  'event' => 'Proactive CPU',
  'select' => {
    '10' => {
      'value' => {
        'critical' => '60',
        'fatal' => '70',
        'minor' => '40',
        'warning' => '30',
        'major' => '50'
      },
      'control' => '$roleType =~ /core/'
    },
    --snip--
    'default' => {
      'value' => {
        'critical' => '70',
        'fatal' => '80',
        'minor' => '50',
        'warning' => '40',
        'major' => '60'
      }
    }
  }
},
These are executed in the select order, and if no control is matched, then the default set is used.
Advanced Control Options
The following are the available control options
Node Properties
- $name
- $node
- $host
- $group
- $roleType
- $nodeModel
- $nodeType
- $nodeVendor
- $sysDescr
- $sysObjectName
Indexed Objects like interfaces
- $ifAlias
- $Description
- $ifDescr
- $ifType
- $ifSpeed
- $ifMaxOctets
- $maxBytes
- $maxPackets
- $entPhysicalDescr
Sample Controls
The crontrols are little pieces of code which will be evaluated when needed, so you might want to do the following sorts of things
| Result | Control |
|---|---|
| Apply the threshold to all devices in the group "Sales" | $group eq "Sales" |
| Apply the threshold to all devices starting with the IP address 192.168 | $host =~ /192\.168/ |
| Apply the threshold to all Cisco IOS devices | $sysDescr =~ /Cisco IOS/ |
| Use this threshold if the interface speed is between 1 and 5 megabits/second | $ifSpeed <= 5000000 and $ifSpeed >= 1000000 |
| Use this threshold if the interface speed is 10 megabits | $ifSpeed == 10000000 |
| Use this threshold if the interface speed is 100 megabits | $ifSpeed == 100000000 |
| Use this threshold if the interface speed is 1 gigabits | $ifSpeed == 1000000000 |
Using the NMIS GUI to Configure Thresholds
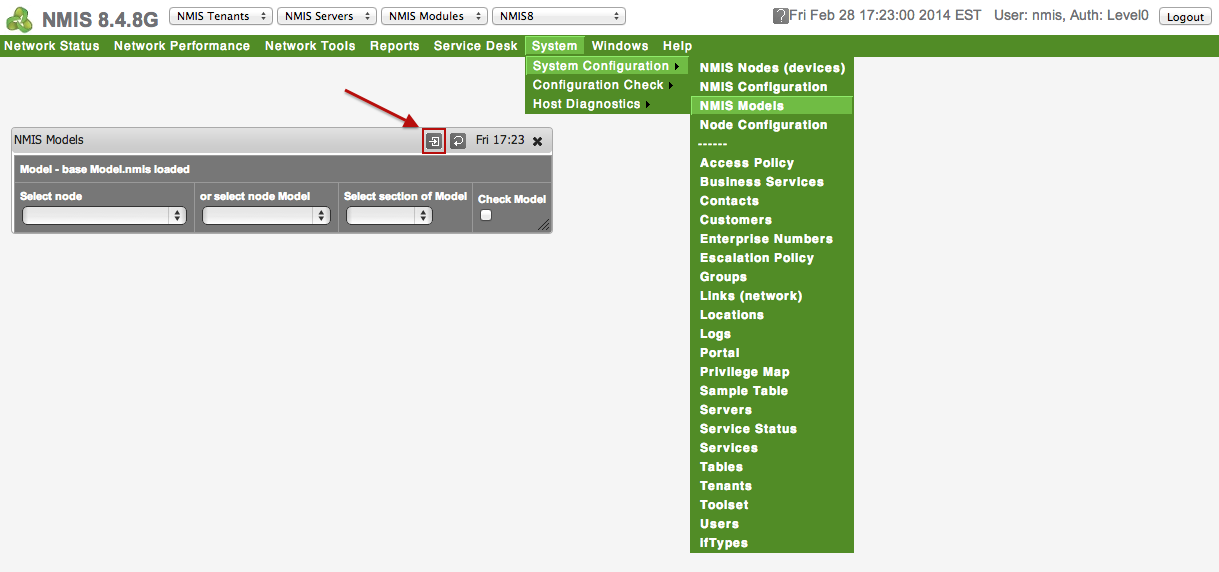
Access the NMIS Models GUI
Access the GUI by clicking on the menu "System -> System Configuration -> NMIS Models", the "NMIS Models" widget will be displayed as shown below. Now this is a BIG form, so clicking on the POP OUT button will place it in its own browser TAB/Window. This is application in NMIS 8.4.8G and onwards.
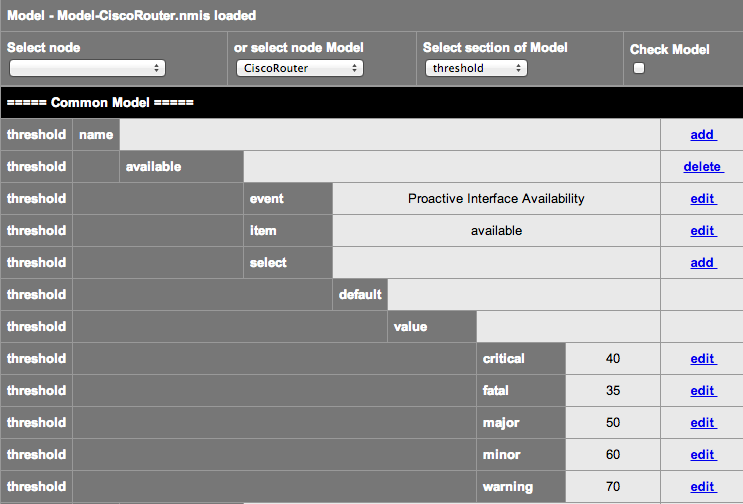
Select the Model and Section to Modify
I have selected the POP OUT and am looking at a full browser form. Select the Model you want to modify, if you are not sure, select the Node, then select the "Threshold" section of the model.
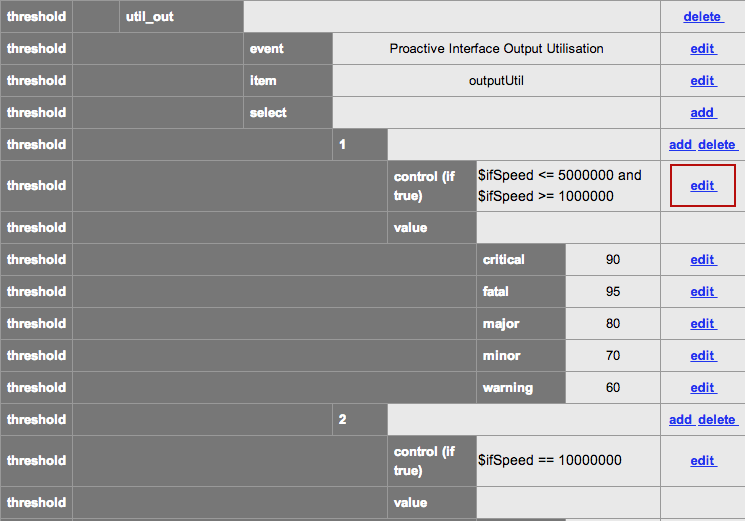
Select the Threshold to Add a Controlled Select
In this example we will add a select section, which will be controlled to only work on a specific device named "meatball" and the interface is "Dialer1". To do this we are going to hi-jack the the threshold in the first position and edit the control. This is because these selects are executed in order and we need ours to be first, this is like an access list on a router or firewall. We will add another in position 10 when we are done. I will also update the default models to have gaps in the orders.......
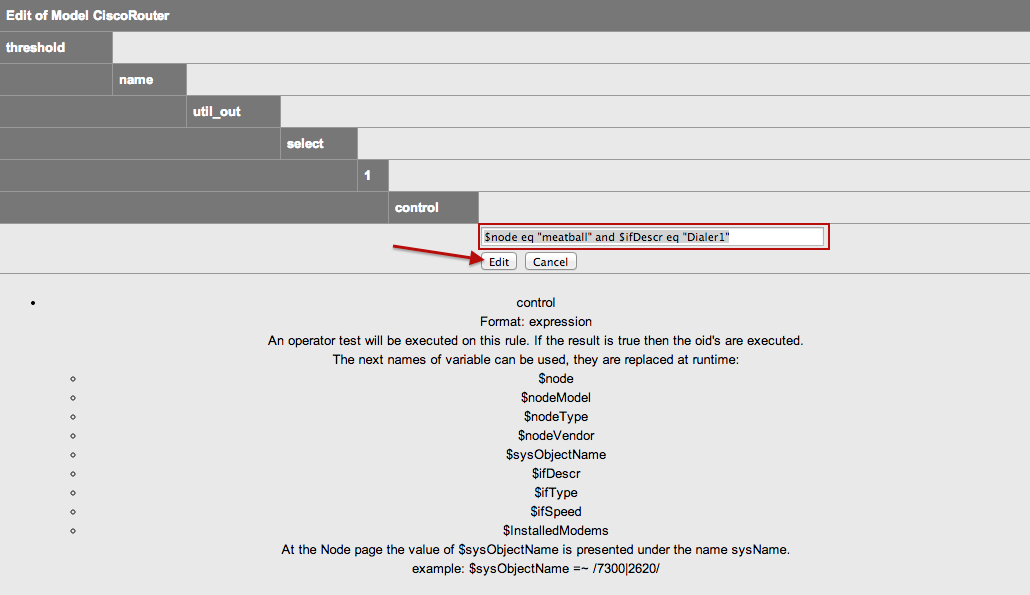
Editing the Control
Now we just change the control to be the string "$node eq "meatball" and $ifDescr eq "Dialer1"" and click "Edit".
A New Control is Available
Now we can tune the thresholds by clicking "edit" on the one we want to change,
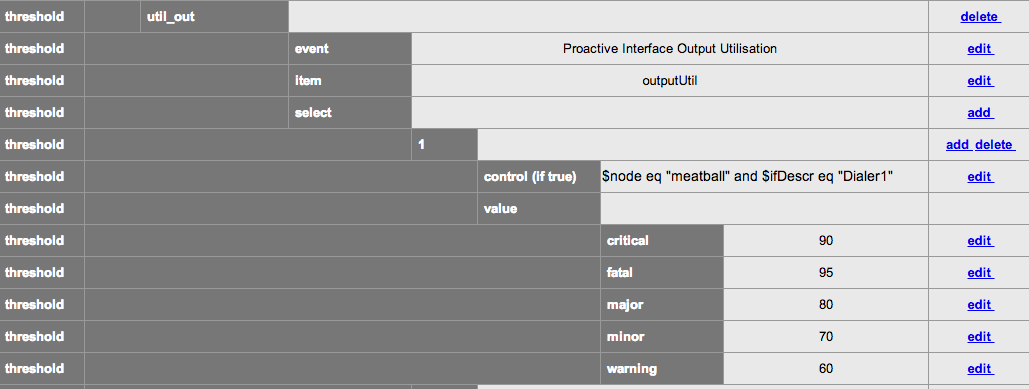
Changing a Threshold
Lets change the warning to be 65%, then click "Edit"
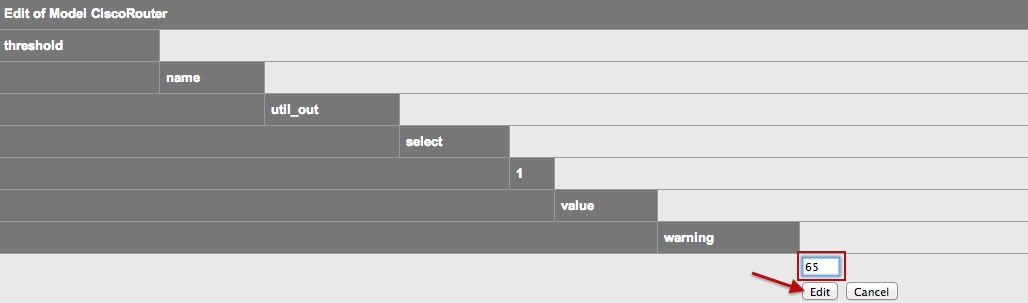
Updated Threshold for Warning
Now the warning level is set to 65%
Applying the Thresholds
The thresholds will be run on the next poll cycle or when they have been configured to run. You can run them on demand from the command line, with the following command (meatball is my router here, so change for your device).
/usr/local/nmis8/bin/nmis.pl type=threshold debug=true node=meatball
Adding a New Select Block
First we add a new select block, we complete in this the order, because 1-4 already exist, I am going to set this one as 10, it will happen after the others but before the default.