Overview
opCharts 3 introduces a new authorization system for MSP's which runs in parallel to the original system, so there are 2 modes running in parallel. Administration of the new "portal" system can only be done by a user with opCharts admin access from the original authorization system.
The new authorization system works by assigning CRUD (create/read/update/delete) privileges for a resource (chart/map/business service) to a role. Users are given a role which allows them to perform the privileges assigned to the role.
The first step in configuring a new user is to create a role, then create a new user who has that role. Last, find a resource and give the role privileges to access it. The examples below use the GUI to perform all operations, the CLI tool section outlines how to perform the same operations from the CLI (which is useful for scripting, exporting and importing).
New Portal User/Role mode
Portal Roles
Each role represents a group of privileges which can have multiple users assigned to it. For example, a role might be named "Customer X View", which is given read permission to Map X, Chart Y and Business Service Z. Now any user assigned to the "Customer X View" role will be allowed to view each of those resources.
Create/Edit
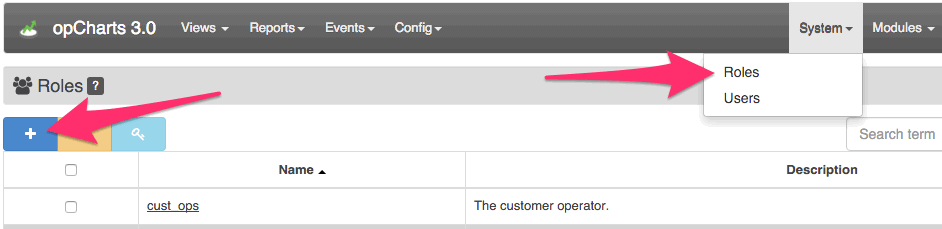
Roles are created and updated from the GUI by using the "System->Roles" menu option, only administrators can create/update/delete roles.
Assign Privileges
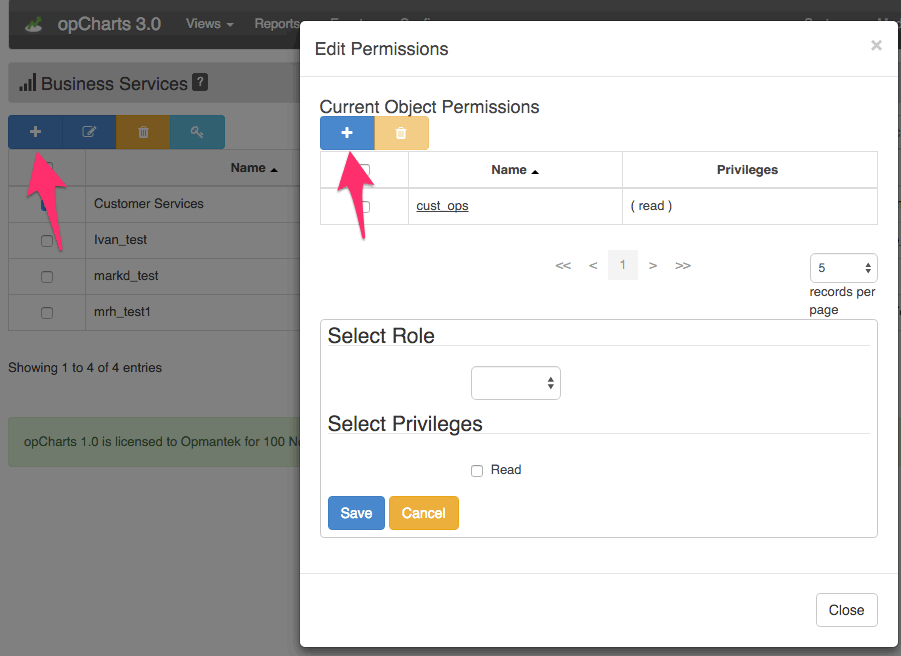
To assign privileges to a role, navigate to a resource list (charts/maps/business services), select a specific resource checkbox from the grid and press the permissions button. A modal will appear listing the current permissions, press "+" in the top left corner, select the desired role and action and save.
Users
Users are given privileges by being assigned to a role. When the user logs in, they will be directed to a page showing resources they have access to. The Views GUI menu will show links to other resources they also have access to.
Create/Edit
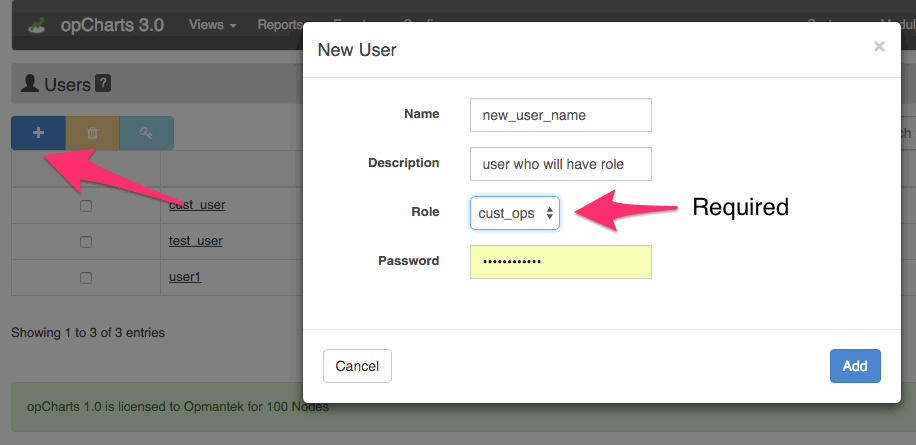
Users are created and updated from the GUI by using the "System->Users" menu option, only administrators can create/update/delete users. Users must be assigned a role (make sure one exists before adding a new user).
Resources (charts/maps/business services)
Resources are the objects that privileges are granted on, these are the things you want users to see but you only want them to see the ones they have access to see.
Assigning privileges to resources is described in the Roles section.
Resource paths:
| Resource | Path |
|---|---|
| Charts | /root/opcharts/chart/<chart_name> |
| Maps | /root/opcharts/map/<map_name> |
| Business Services | /root/opcharts/business_service/<business_service_name> |
| Dashboards | /root/opcharts/dashboard/<dashboard_name> |
CLI Interface (oprbac_admin.pl)
The oprbac_admin.pl program gives you access to all functions that the GUI provides but also has more functionality which may not be visible from the GUI. The help text from oprbac_admin.pl describes it's basic usage
Usage: oprbac_admin.pl act=[action to take] [extras...]
oprbac_admin.pl act=list-{users|roles|privs|objects} [verbose=0]
verbose: include data beyond name and description
oprbac_admin.pl act=export-{user|role|priv|object} {name=...|path=...} [file=path]
file: save JSON to file, otherwise printed to STDOUT.
oprbac_admin.pl act=delete-{user|role|priv|object} {name=...|path=...}
deletes the indicated record.
oprbac_admin.pl act={create|update}-{user|role|priv|object} [name=] [description=] [property.zyx=] [file=path]
file: read JSON from file and update record with that data.
oprbac_admin.pl act=check-access user=userX action=actionY object=pathZ [verbose=0]
returns 1 if the user is authorized to perform the given action.
oprbac_admin.pl act=prune-orphans
removes unused orphaned privilege entries.
More advanced functionality and processes are listed below
Grant a Role access to an Object (NMIS Group in this case)
Granting access to different resources in opCharts is done by creating an object in RBAC that represents the resource in opCharts and then granting a role privileges to that object. The object that is created is linked to the opCharts resource through a path, most of these paths can be found in a table in the Resources section. In this instance we will grant access to an NMIS Group, the path for this is /root/opcharts/group/<group_name>.
- Create a privilege, this could be auto-created for us when doing other actions but then we would have to look up the name or id created by parsing output. I’ve named it ‘group_branches_read’ because I intend for it to represent the ability to read the branches group, it can be named whatever you want (as long as it is unique).
Create an object that represents the group by giving the correct path (with the group name), and tell that object that read permissions are granted using the privilege name from step #1.
Create a new role, and give the role our privilege.
nmis64:bin root$ ./oprbac_admin.pl act=create-priv name=group_branches_read
created new privilege (internal id 582ba442a77ea70da3448f11)
nmis64:bin markd$ ./oprbac_admin.pl act=create-object path=root,opcharts,group,Branches read_privileges=group_branches_read
created new object
nmis64:bin markd$ ./oprbac_admin.pl act=create-role name=BranchesRole privileges=group_branches_read
created new role (internal id 582ba4c9a77ea70dcf4c2ea1)
In the GUI you should now see that group “Branches” has a new role listed with read permissions. The privilege “group_branches_read” could be used to access to other objects as well.
The oprbac_admin actions exist for update as well so if the role already exists and you want to add a new privilege just use update and set the new privilege.