Introduction
This document describes how to install NMIS8 (Version 8.5.10G and newer) on GNU/Linux systems.
Caveats
NMIS8 has been widely deployed and tested on many Linux distros, with Red Hat/CentOS being the most popular among our customers. This document contains variations specific to several Linux distros, but not all of them have been tested equally heavily: Centos 6, Debian 8, Ubuntu 12 and 14 are our main platforms for in-house testing.
We do appreciate your feedback (and any modifications or changes) that you might submit to support@opmantek.com!
Assumptions
The reader is assumed to have a working knowledge of UNIX or GNU/Linux systems and what Perl is. While NMIS is written in Perl, you do not need to be a "Perl hacker" to install this program and make it work. Some fundamental knowledge of how to compile software on UNIX systems would certainly be helpful, but is by no means required.
This document will use the <nmisdir> tag to refer to NMIS's installation directory (whose default is /usr/local/nmis8); the tag <version> stands for the full version of NMIS (at this time 8.5.12G).
The Installation Process
Linux Distribution
First, install your GNU/Linux distribution of choice. It is recommended to select a basic installation type with no extra stuff. That means no GNOME, KDE, "Server" packages, or anything else.
Depending on your choice of distribution, the "minimal" installation type may not be totally sufficient for NMIS: with CentOS/Redhat 7 for example, "minimal" does not include Perl and in this case you'll have to install the Perl core (using sudo yum install perl-core) before NMIS can be installed. (Versions 8.5.14G and newer will detect this situation and offer to install perl for you.)
Linux Security Settings: SELinux and Firewalling
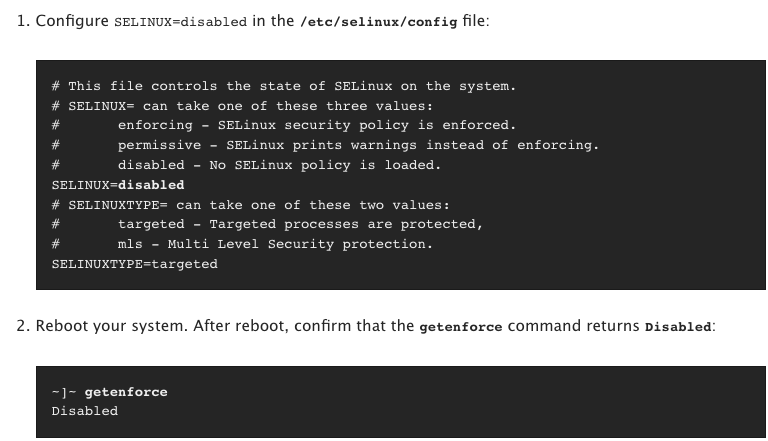
We recommend that you turn off SELinux. Permissive mode was tested and it worked well, just very nagging; the default mode is known to interfere with NMIS. Disabling SELinux is a lot easier than performing the extensive configuration that SELinux needs. To check if SELinux is disabled you can use the command getenforce. If SELinux is enabled in CentOS 6.8, an example of how to disable it is below:
Similarly, if you have a firewall on your server (e.g. iptables / firewalld ) you need to make sure that it accepts incoming HTTP (possibly HTTPS) connections, and SNMP traps and Syslog connections/packets. This involves incoming connections to TCP ports 80 and 443, and UDP ports 161, 162, and 514.
NMIS8 Installation
As of February 2016, NMIS is distributed in a self-extracting download format that simplifies the installation process quite a bit.
You can download NMIS from the Opmantek website at https://opmantek.com/network-tools-download/; the distribution file is called nmis<version>.run, and your browser will likely prompt you regarding what to do with this '.run' file; you should tell it to Save the file, ideally in /tmp.
Starting the Installer
Please note that the installer must be run with superuser privileges; if you're not the root user you'll have to use sudo or su to switch privileges.
Starting the new self-extracting installer is trivial: you simply tell your shell to run it, using one of two mechanisms:
- The simplest way to achieve this is to type "
sh ./nmis<version>.run" - You can also modify the permissions of the .run file to indicate that it is executable, then start it directly.
To do so, you'd run"chmod u+x ./nmis<version>.run" followed by "./nmis<version>.run".
The installer will first run an archive integrity check, decompress the archive, then start the interactive phase of the installation.
The installer takes care of all necessary operations on the supported platforms: all pre-requisite software is installed and configured, an existing NMIS installation is upgraded in place and basic integration of NMIS with the operating system is performed on your behalf as well.
The installer does require Internet access for installing pre-requisites using apt-get, yum and CPAN (but we do have a few suggestions for dealing with a system where Internet access is restricted).
As of 8.5.6G using the installer is the only supported method for installing or upgrading NMIS, because by now it is now suitably mature and robust, and because it's very very easy to miss crucial operations in a totally manual installation. Please see the Advanced Installer Use section at the bottom if you need more precise control over the installer.
If the installer asks you about installing some Perl modules with CPAN...
...don't panic, this is more or less expected: not all Linux distributions provide readymade packages for all of NMIS' needs, thus certain modules require installation from CPAN, the "comprehensive perl archive network").
There is one important aspect regarding the initial configuration of the CPAN tool. Depending on your versions of Perl and the CPAN tool, and whether SELinux is enabled or not, you may be asked about the "approach for installing modules" in a dialog similar to this example:
Warning: You do not have write permission for Perl library directories.
To install modules, you need to configure a local Perl library directory or
escalate your privileges.  CPAN can help you by bootstrapping the local::lib
module or by configuring itself to use 'sudo' (if available).  You may also
resolve this problem manually if you need to customize your setup.
What approach do you want?  (Choose 'local::lib', 'sudo' or 'manual')
It is essential that you choose sudo for this question, not the default local::lib.
Initial NMIS Test
When the installer has completed its work you should be set to start using NMIS. As an initial check of NMIS you should likely try the command line tool nmis.pl and then the NMIS web GUI:
cd /usr/local/nmis8/
sudo ./bin/nmis.pl type=audit
This command will do a quick check of directory and file existence as well as ownership and permissions; if all is well it will not print anything whatsoever.
http://<yourhostname-or-ip>/nmis8/, and that page shows both a link to the NMIS dashboard and the online NMIS documentation.Check the NMIS Dashboard. If the web server is running but you can't access the GUI check your firewall; some Linux distributions do ship with a firewall enabled by default (e.g. RedHat 7) so a quick sudo iptables -n -L is recommended to verify the firewall status.
After authenting you should see the dashboard in all its glory, likely overlapped by the "Basic Setup" helper panel if this is an NMIS installation from scratch.
iptables -L on your NMIS server, as well as /etc/selinux/config and the exit code of selinuxenabled.SNMPD, Net-SNMP and collecting stats of the NMIS server itself
NMIS8 ships with one default node configured for collection, primarily to prove it is all working. This node is called localhost and NMIS will collect statistics from your NMIS server using SNMP - if an SNMP agent is available, or just Ping statistics if not.
However, the installer does not automatically configure this local Net-SNMP daemon; if you would like to collect the NMIS server's statistics follow the instructions below - otherwise you're done with the installation.
You will likely want to consult and use the example configuration for Net-SNMP's snmpd, which ships with NMIS in the file <nmisdir>/install/snmpd.conf.
Because the installer has installed Net-SNMP for you already, you only need to backup its default config and move in the NMIS example one. You should very much modify this config to secure the SNMP read access according to your organisation's security policy!
cd /usr/local/nmis8
mv /etc/snmp/snmpd.conf /etc/snmp/snmpd.conf.orig
mv /etc/snmp/snmptrapd.conf /etc/snmp/snmptrapd.conf.orig
cp install/snmpd.conf /etc/snmp/snmpd.conf
cp install/snmptrapd.conf /etc/snmp
cp install/snmptrapd.options /etc/sysconfig/snmptrapd # for CentOS/Red Hat only
Debian/Ubuntu
The last command in the list above will fail as there is no /etc/sysconfig directory on this platform. Instead the snmptrap service is started by the snmpd service, and is enabled by updating the file /etc/default/snmpd with the following line:
TRAPDRUN=yes
Auto Start SNMP Daemons
Ensure that you tell your system to start snmpd and snmptrapd automatically on boot.
CentOS/RedHat 6
# as root
/sbin/chkconfig snmpd on
/sbin/chkconfig snmptrapd on
CentOS/RedHat 7
# as root
systemctl enable snmpd.service
systemctl enable snmptrapd.service
Debian/Ubuntu
# as root
update-rc.d snmpd defaults
update-rc.d snmptrapd defaults
service snmpd start
service snmptrapd start
Run a Test Update
Once your local snmpd is running, you should run a test update operation:
sudo /usr/local/nmis8/bin/nmis.pl type=update node=localhost info=true
The output will look similar to this example:
Copyright (C) Opmantek Limited (www.opmantek.com)
This program comes with ABSOLUTELY NO WARRANTY;
This is free software licensed under GNU GPL, and you are welcome to
redistribute it under certain conditions; see www.opmantek.com or email
contact@opmantek.com

NMIS version 8.5.6G

14:42:47 runPing, INFO (localhost) PING min/avg/max = /0.01/ ms loss=0%
14:42:47 runPing, Finished with exit=1, nodedown=false
14:42:47 getNodeInfo, Starting
14:42:47 getNodeInfo, sysObjectId=1.3.6.1.4.1.8072.3.2.10, sysObjectName=_linux
...
14:42:47 Number of Data Points: 17, Sum of Bytes: 136, RRDs updated: 1, Nodes with Updates: 1
14:42:47 End of nmis-Config-update-localhost Processed 1 nodes ran for 1 seconds.
As the installer has already installed the default NMIS cron schedule NMIS will poll and collect all known nodes every 5 minutes. You can now either run a test collect or sit back and wait for NMIS to do the next one automatically:
sudo /usr/local/nmis8/bin/nmis.pl type=collect info=true
After that collect operation has concluded you should see the newest data for your NMIS server on the NMIS dashboard.
Advanced Installer Use
Access the source without installation
If you want to read the installer source, or access the distributed files without actual installation, then simply pass the arguments –-keep --noexec to the run file invocation, e.g.
sh ./nmis8.5.12G.run --keep --noexec
This tells the self-extracting installer to just unpack the archive (into the directory nmis<version>) and to not start the interactive installer component.
Install in a non-standard location
If you want the installer to install NMIS into a non-standard directory, change to invocation to include site=<somepath> (after a mandatory -- separator), e.g.
sh ./nmis8.5.12G.run -- site=/opt/nmis
For more information regarding installing NMIS in a non default location please review NMIS8 - Installing NMIS in a Non Standard Location
Only check and install dependencies
If you don't want to perform the actual installation but only perform the software dependency resolution and check and install any prerequisites, use listdeps=true (after a -- separator), e.g.
sh ./nmis8.5.12G.run -- listdeps=true
Non-interactive, automatic installation/upgrade
If your NMIS 8.5.12 was downloaded after 2016-07-11, then the installer also offers a non-interactive automatic mode, where all the normal questions are automatically answered with the default choice.
To use this mode, simply pass in -y (somewhere after the mandatory -- separator), e.g.
sh ./nmis8.5.12G.run -- -y
# recommended for safety: wrapped in screen with output logging on
screen -L sh ./nmis8.5.12G.run -- -y
Installation Log
The installer creates a log of all the operations that it performs, which is saved in the main NMIS installation directory as install.log. Subsequent NMIS upgrades add extra information to that log file, but the installer always starts its work with an initial log message that indicates when an installation/upgrade was performed. It is safe to delete the installer log file if you don't want to keep old installation and upgrade info.
Historical Manual Installation Instructions
The old manual installation instructions are available for your perusal on this page. Please note that these old instructions are no longer updated and will definitely diverge more or less from current best practice! (which is to let the installer handle the installation intricacies on your behalf).