Introduction
So you've downloaded the latest version of the Opmantek Virtual Appliance from https://opmantek.com/network-tools-download/ and now you want to set it up and take it for a test drive to see how NMIS and the Opmantek networking modules can help you administer your network. No problem. Easy.
- Import the OVA (Open Virtual Appliance Format) or OVF file into VMware, Virtualbox,...
- Start up the new VM, optionally set a static IP address
- Access NMIS and the other Opmantek applications in your browser
Using the OVA
All Opmantek Virtual Appliance releases since January 2018 are published as a single "ova" file (Open Virtual Appliance), which encapsulates all necessary data in a single archive.
The import instructions below can be used to deploy the Opmantek Virtual Appliance straight from that one downloaded file.
How to import the Virtual Appliance into your virtualization infrastructure
VMware using the Opmantek OVA file
There are several options for VMware software.
We require the VMware OVF Tool if importing to ESXi directly or via vCenter:
- https://www.vmware.com/support/developer/ovf/
- We assume you have it installed and know where it is.
1. Importing the OVA file directly to ESXi
You can import the OVA file directly into ESXi using VMware ovftool, from the PC or server you run ovftool. Run the command like this:
|
Remember to set the Virtual Machine name you like, the datastore you want, the network you want, and point it at the server you want to deploy to.
2. Importing the OVA file to an ESXi Datacenter via vCenter using ovftool
- Numerous attempts were made to import this OVA using the VMware vSphere HTML5 Client, with Chrome, Chromium and Firefox as browser:
- Every attempt timed out.
- We have yet to experience a failed import of this OVF using VMware commandline tool ovftool:
- For this reason VMware commandline tool ovftool is recommended for importing OVAs' via VMware vCenter
You can import the OVA file into a VMware ESXi Datacenter via VMware vCenter using VMware ovftool, from the PC or server you run ovftool. Run commands like this:
In this example the VMware vCenter 6.5 install has created:
FQDN 'photon-machine' with
user '
administrator',sso domain name '
vsphere.localdomain', andsso password '
Vagrant1!'which must be escaped when used in this context using ovftool:
escaped password: '
Vagrant1\!'
- VMware ovftool option that should be determined appropriate to this use case for this OVA import:
-ds="datastore_name-number"Required if the selected Datacenter has more than one datastore
-nw="network_name-number"Required if the selected Datacenter has more than one network
- --diskMode
Specify the disk format. You can specify the following formats:
monolithicSparsemonolithicFlattwoGbMaxExtentSparsetwoGbMaxExtentFlatseSparse(vSphere target)eagerZeroedThick(vSphere target)thin(vSphere target)thick(vSphere target)sparseflat
Determine the Datacenter name: Determine the Datacenter available options: Determine the Datacenter host IP or FQDN: Import Opmantek-20200708-VM9-Centos7.2003-3-64bit.ova which is in the current directory, in this example using vSphere option --diskMode=thin: |
3. Upgrade the Virtual machine hardware version (optional)
The Opmantek Virtual Appliance ships with the virtual machine hardware version set very low for maximum compatibility, but you may want to upgrade the hardware version to a higher level (to leverage performance benefits, remove memory limitations, etc.) as described on the VMware website
VirtualBox
VirtualBox will import directly from an OVF/OVA file so you can just start up VirtualBox and select "Import Appliance..."

Browse to where you unzipped the file and select the ovf file

Select the file, you should see a screen something like this:

It should be safe to Import. The import process may take a couple of minutes to complete, just enough time to grab a cup of coffee I'd say.
If you have any trouble the VirtualBox documentation is here: https://www.virtualbox.org/manual/ch01.html#ovf
Important Note regarding Ext4:
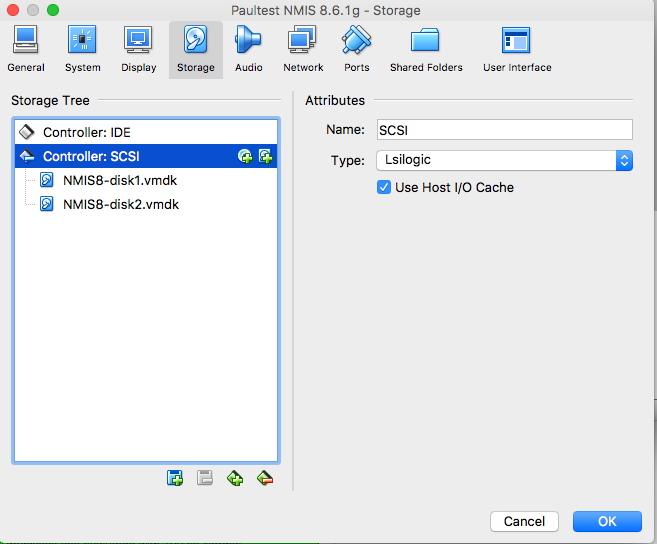
If your Virtualbox host is Linux and your VMs are stored on XFS or Ext4 file systems, then it is absolutely necessary that you enable the "Host I/O Cache" for all virtual disk controllers after importing the OVF file, or you run the risk of file system corruption in your guest. On one of our test systems (Linux kernel 3.14.23, Virtualbox 4.3.14) the VM wouldn't even fully get through the first boot before the virtual disks got corrupted - but with Host I/O Cache on everything is fine.
Below is an example of how to enable Host I/O Cache using VirtualBox:
CentOS 7 on VirtualBox
It's now highly unlikely that VirtualBox users will find themselves at the dracut emergency shell prompt when first booting our vm that runs CentOS 7.
We continue to provide this information in case needed:
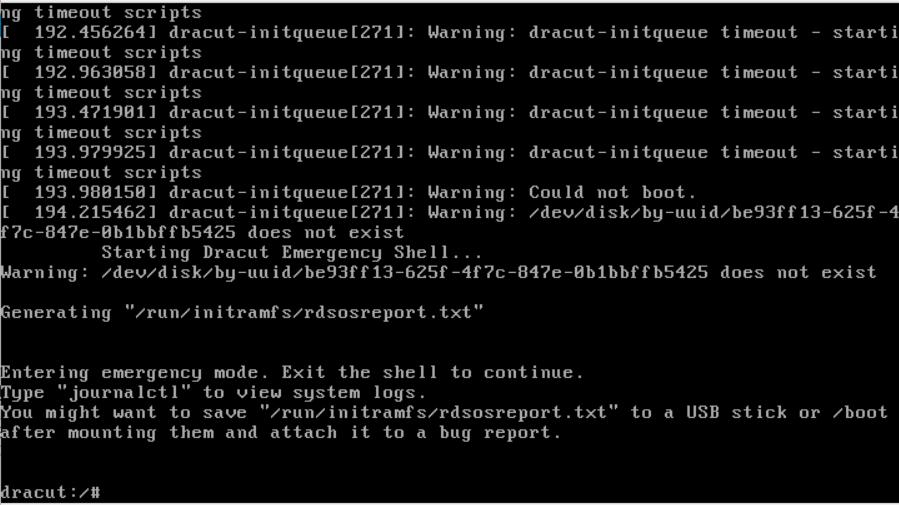
When faced with this obstacle reboot the vm selecting the rescue kernel.
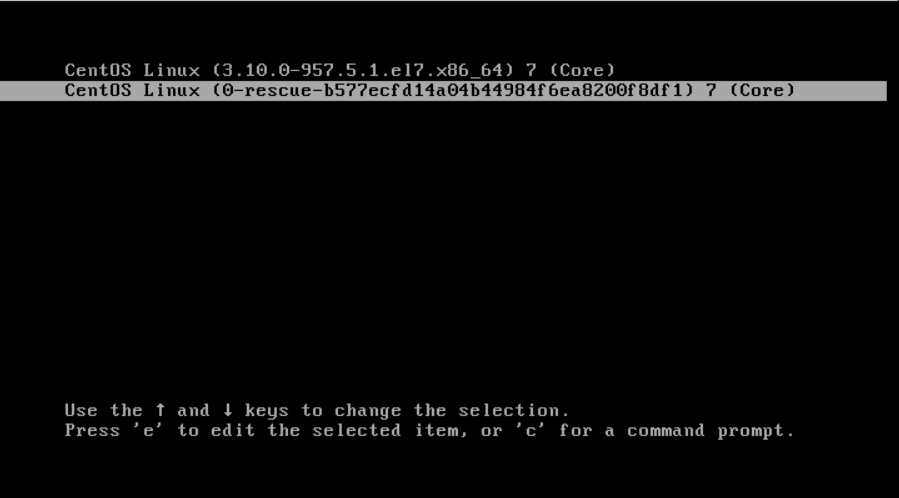
After it boots login as normal and try the try the following dacut command.
dracut -f /boot/<kernel_image> <kernel_name>
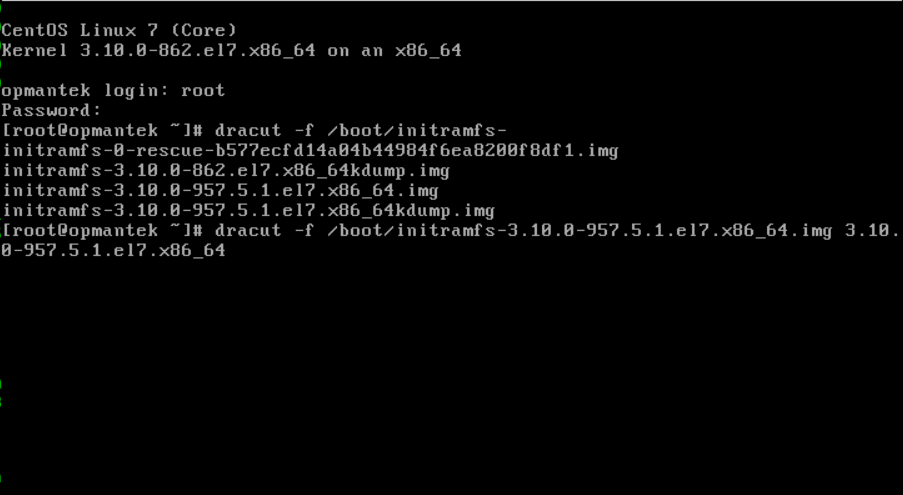
If the command completes successfully reboot the vm normally. Be aware that future kernel updates may require this maneuver be done again.
Other Hypervisors
To use OVF/OVA files with other virtualisation systems like KVM you may have to convert the OVF file to a native format; Two well-known tools for this purpose are virt-v2v (available in CentOS6/RHEL) and virt-convert (in Debian).
VMware Fusion 11
Even though, there are no caveats in relation to importing the Virtual Appliance using VMware Fusion, it is important to remind users to grant permission to VMware Fusion to fully execute on OSX, specially after installing it.
The following message is displayed while running the VM without the permission granted.
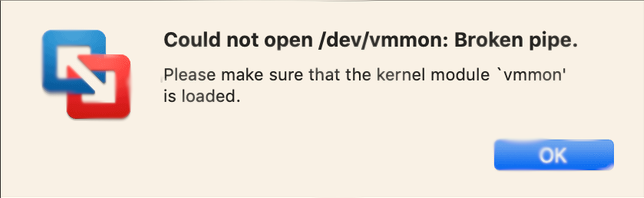
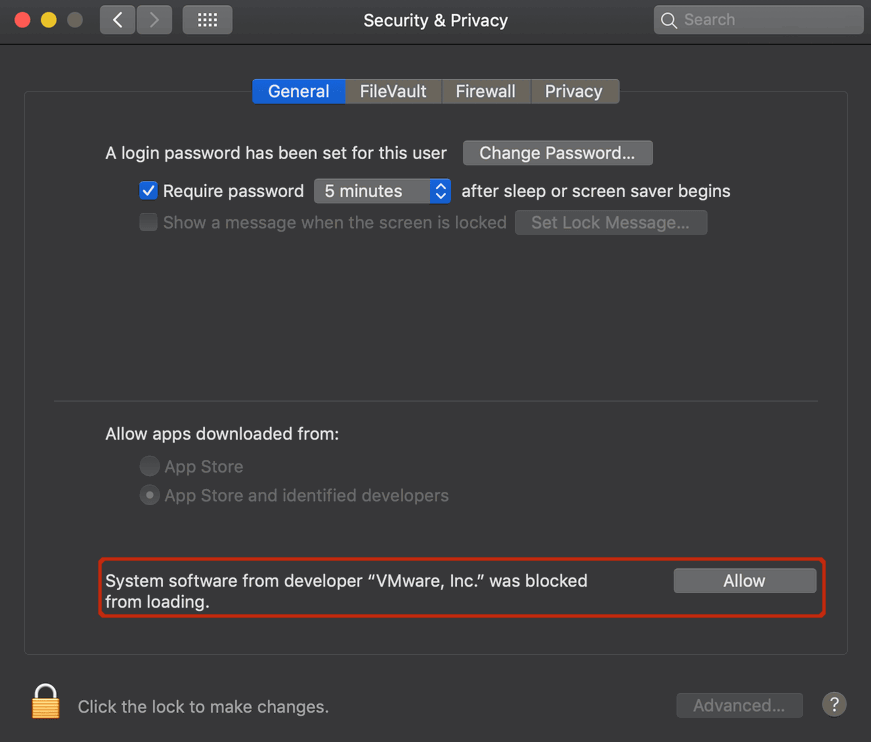
The permission should be granted on System Preferences > Security & Privacy
Hyper-V
The Windows Hyper-V technology does not fully support the OVF industry standard. Microsoft documents a complex and somewhat limited procedure on their page about converting OVF files to Hyper-V. There are third-party conversion tools available that simplify this deployment scenario, for example StarWind's free V2V Converter which worked well in our tests.
Debian - Customizing Network Settings
The Debian team has an excellent wiki page dedicated to customizing the network configuration; this page is available in several languages:
https://wiki.debian.org/NetworkConfiguration
CentOS - Start up the VM and set a custom IP Address, DNS... (optional)
At this point the VM has DHCP enabled, and therefore it will receive a dynamic IP address suitable for your environment. The easiest way to access the VM at that point is from the virtualization software terminal. So go ahead and boot the VM. After the VM is finished booting you will be welcomed by a login prompt. First, log in using the default credentials.
If it's desirable to customize the network settings we offer the following options:
- Option #1 - Manual configuration
The VM appliance is a normal CentOS 7 system, hence all the mechanisms for network configuration in CentOS are available.
Most specifically you'll be interested in the files/etc/hosts,/etc/sysconfig/network,/etc/sysconfig/iptablesand/etc/sysconfig/network-scripts/<interface_name>. - Option #2 - Use our example network configuration files
Root's home directory contains 2 example network configurations, one for static IP's and one for DHCP. Copy the one you require to
/etc/sysconfig/network-scripts/and edit it to suit:cp ifcfg-ens192.static /etc/sysconfig/network-scripts/<interface_name>
Be sure to verify the following settings:
- IPADDR
- NETMASK
- BROADCAST
- GATEWAY
- NAME; the interface name as found with the ip address command
- DEVICE; the interface name as found with the ip address command
- DNS;
Next restart the network service for the setting to take affect. In our testing the DHCP address was still present, and the static IP assigned as a secondary (this can be seen with the 'ip address' command). The DHCP address can be removed by using the 'ip address command del' command or be rebooting the system.
TYPE=Ethernet
IPADDR=192.168.10.201
NETMASK=255.255.255.0
BROADCAST=192.168.10.255
GATEWAY=192.168.10.51
PROXY_METHOD=none
BROWSER_ONLY=no
BOOTPROTO=static
DEFROUTE=yes
IPV4_FAILURE_FATAL=no
IPV6INIT=yes
IPV6_AUTOCONF=yes
IPV6_DEFROUTE=yes
IPV6_FAILURE_FATAL=no
IPV6_ADDR_GEN_MODE=stable-privacy
NAME=enp0s3
UUID=9099afe7-6dd6-4aec-bd93-8950b67ab8f5
DEVICE=enp0s3
ONBOOT=yes
DNS1=192.168.10.80
DNS2=8.8.8.8
Set Up Firewall (optional)
Please note that by default the Opmantek VM Appliance does NOT have a firewall active. If you would like local firewalling on your VM, you can easily enable that:
The standard iptables tools are installed, and all you would have to do, is enter your desired rules in /etc/sysconfig/iptables, followed by service iptables restart AND a final one-off run of chkconfig iptables on. The service call enables your firewall rules, while the chkconfig call enables activation of the firewall rules on boot. Until and unless the chkconfig step is taken, your firewall rules won't persist when the VM is rebooted. Besides this, somewhat low-level, method of configuring an iptables firewall there are also various user-friendly frontends available for installation with yum.
Accessing the Application Modules on the VM
By default the VM boots with DHCP enabled, and once you determine the hostname or IP address of the VM you can access it a web browser using a URL like:
http://nmis.domain.com/ or http://192.168.1.42/
NOTE - If you do not know the IP address of your install run the command ifconfig and use the IP address next to inet addr. Running the command hostname will give you the host name of the VM.
You will be presented with the following screen.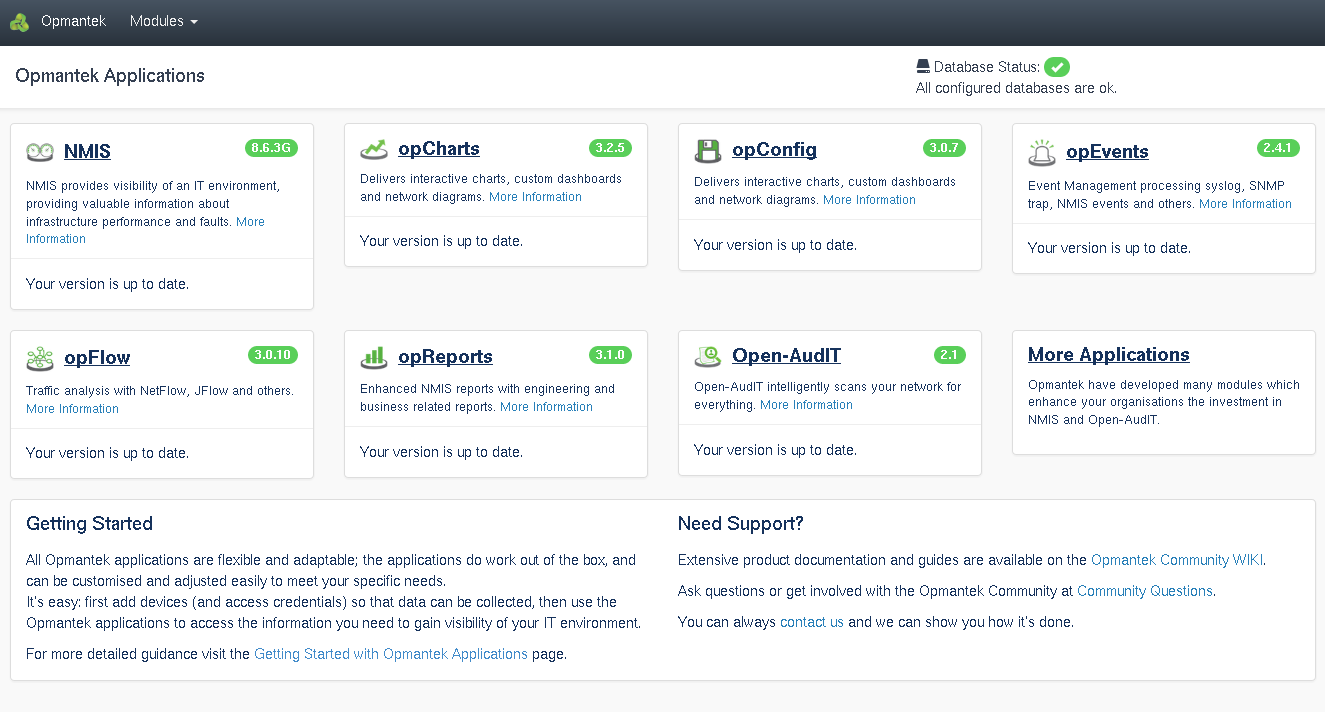
All the module names are clickable and link to the respective applications; but you can also navigate directly to NMIS, Open-AudIT or any of the other Opmantek applications.
Simply open your favourite web browser and navigate to:
- NMIS8 Virtual Appliance:
http://<vm ip address>/nmis8for NMIS,http://<vm ip address>/open-auditfor Open-AudIT Community,- or
http://<vm ip address>/omkfor the list of all Opmantek applications.
- NMIS9 Virtual Appliance:
http://<vm ip address>/nmis9for NMIS,- or
http://<vm ip address>/omkfor the list of all Opmantek applications.
The default access credentials are username "nmis", password "nm1888" (more info regarding credentials can be found on this page).
Example NMIS log in page:

Once you've got either the NMIS dashboard or one of the Opmantek application dashboards open, you can also navigate between modules using the "Modules" and "NMIS Modules" menus, respectively.
Once you have Access you will likely want to start configuring NMIS and the nodes you want to manage. Continue below to the NMIS Setup and Configuration quick start guide to learn how.
NMIS8 Setup and Configuration
NMIS8 - A Quick Getting Started Guide
NMIS9 Documentation
Secure Access with https
The VM ships with support for secure https access enabled, and you can use https instead of http in any of the URLs mentioned above.
However, the included certificate-key pair is the same for all VM downloads, and it is a self-signed certificate (for "opmantek.local"): this will cause your browser to display security warnings.
If you want to use https access operationally it is highly recommended that you replace this shared default key-certificate pair with your own (or use an automated certification authority like https://letsencrypt.org/ for example).
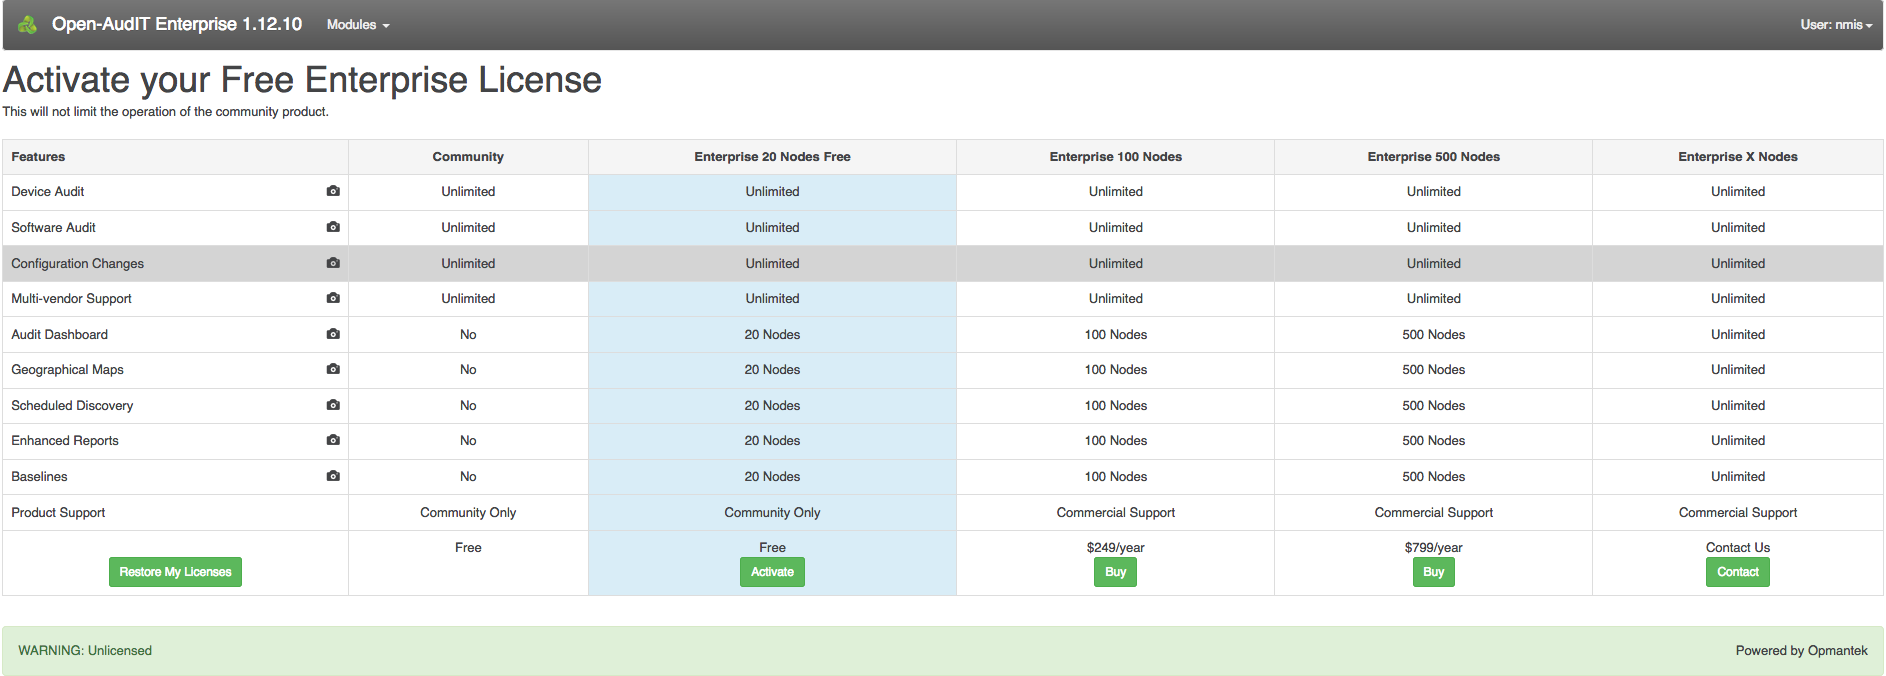
Application Module Licensing
The first step to using a module is knowing how to open it, the next is to get a license for it. This process is simple and painless: all products on the appliance (except opFlow) now support free licenses (which are not time-limited but limited to 20 nodes). For these applications the initial dialog offers the generation of such a free license; for opFlow the licensing dialog offers guidance for obtaining a trial or a full license. Example screen shot of activating free Open-AudIT trial below:
You can also use the "opLicensing" module (reachable at http://<vm ip address>/omk/opLicense or from the Modules menu) to manage your licenses comfortably (including the ability to download previously purchased licenses from the Opmantek website). More info about opLicensing can be found here.
Exploring and Configuring Application Modules
All modules on the Virtual Appliance come with their configuration set to very minimal but safe defaults; to explore the full functionality available you will very likely have to make config modifications to suit your environment. These configuration options are all documented on this site, the Opmantek Community Wiki, in the per-application section (or "Application Space"); certain common, shared aspects are discussed in the "opCommon" space.
For all recent Opmantek applications you'll find links to the respective sections of Wiki in the "Help" menu (usually under "Online Documentation"); there's also an online version check on the welcome/landing page, and on each application's "About" page which helps with keeping your modules up to date.
If the command completes succesfully reboot the vm normally. Be aware that future kernel updates may require this manourvrer be done again.