For Open-AudIT 4.2.0 onward
Introduction
The Integrations endpoint allows you to define an integration which you can then use to import and export Open-AudIT data to an external system. At present the single supported Integration type is "nmis".
This is as it was prior to 4.2.0. With 4.2.0 an onward we have rewritten the code from the ground up to work in an external system agnostic way. With the 4.2.0 release we ship with a default Integration already created for NMIS. Going forward other external systems will be supported. All that is required is a new file to implement the required functions that an integration needs. There are no external dependencies or prerequisites.
For the purpose or brevity, you can substitute any external system where I refer to NMIS below (when implemented).
It "Just Works" with NMIS.
Our goal with the initial integrations release was specifically for NMIS to Open-AudIT integration to "just work". If you are using the programs on Linux, you can literally click a single button to execute the integration. Nothing more is required. Having said that, the integration itself is extremely configurable - so if something isn't to your preference, it can easily be changed.
If you are using Open-AudIT on Windows or if your NMIS server isn't on your Open-AudIT Server (in the case of some Linux installs), you will need to supply access credentials and a URL to the remote NMIS - but that's all! Yes - Integrations between NMIS and Open-AudIT even work with Windows based Open-AudIT now!
Creating an Integration
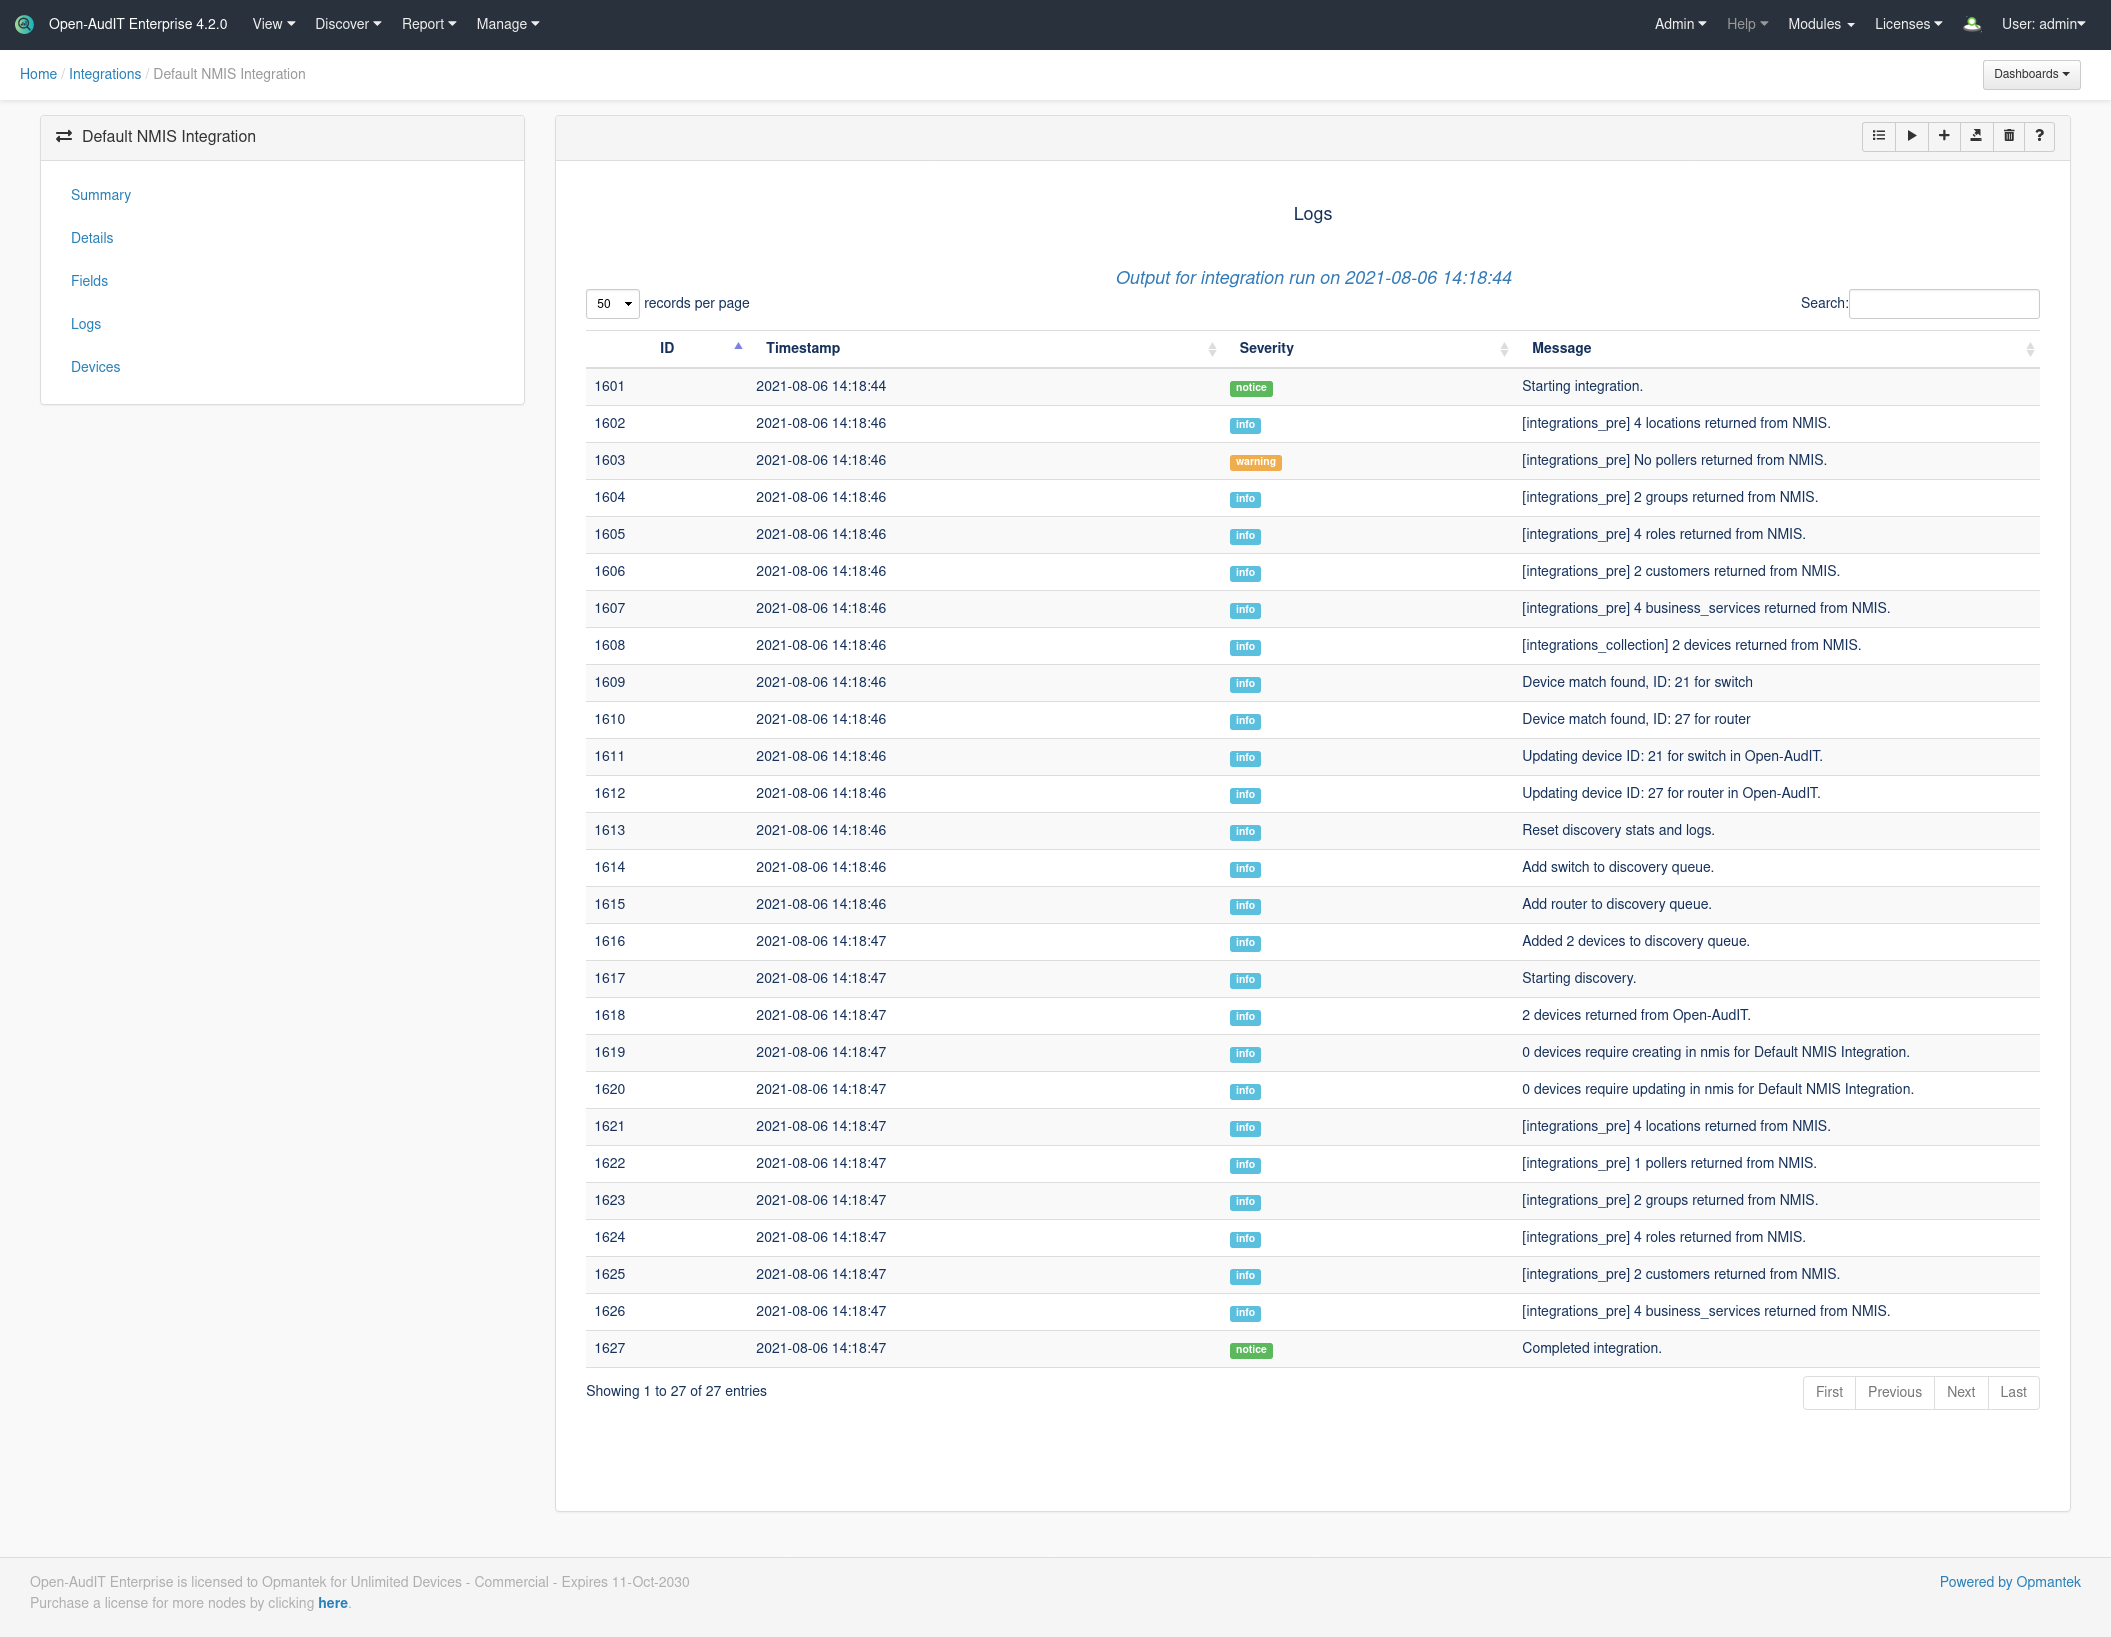
As usual, go to menu → Manage → Integrations → Create Integration. As above, if you're running on Linux and you have NMIS on the same server, you don't need to do anything other than click 'Submit'. I cannot make it easier than that ![]()
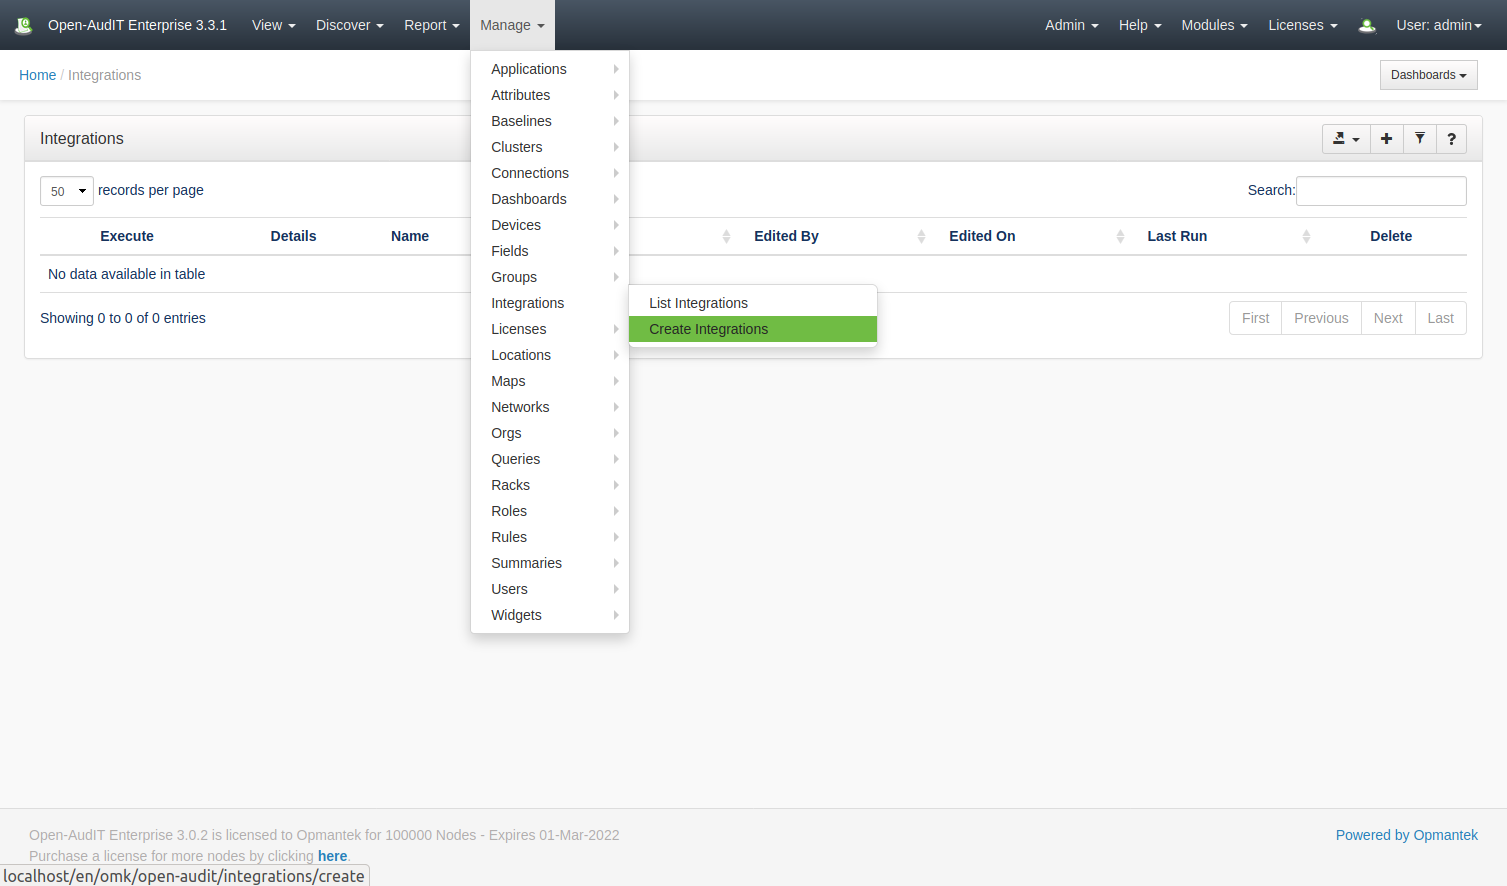
If you're on Windows or your NMIS server is remote, you will need to supply the URL, username and password to access that server.
Above are the only required items.
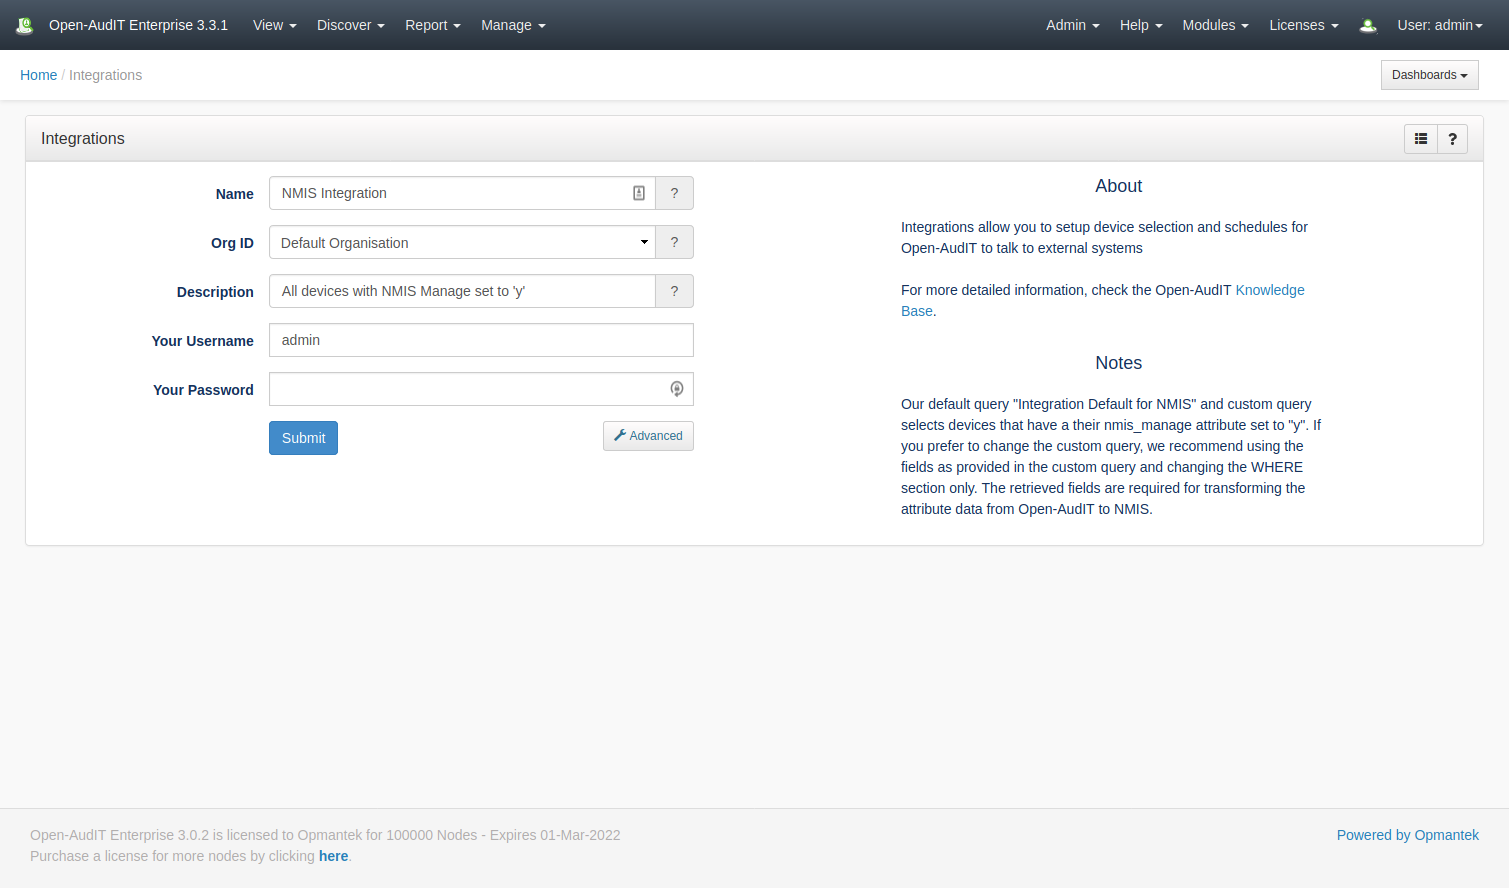
If you wish to dig in and customize the Integration, click the Advanced button (and try not to be overwhelmed!).
You can customize the entire integration down to which system (NMIS or Open-AudIT) is the authority on a per field basis. There are options to create and/or update devices in Open-AudIT or NMIS. Should we run a discovery on a created or updated device and so much more. There are explanations for each item on the right side of the page.
You can select the devices to be integrated by choosing any attribute in the system (device) table and matching (see menu → Admin → Database → List Tables → system for a list of fields). An attribute match can only match a single value.
If you wish to run a Discovery on an externally provided device, select the option and when the Integration is created, so s the Discovery.
What about fields that I want from NMIS that aren't in Open-AudIT? We've got you covered. Any fields in the external system (NMIS) that don't exist in Open-AudIT will be automatically created as Open-AudIT Custom fields.
Our Default Integration
By default we integrate all devices with their nmis_manage attribute set to 'y'. With 4.2.0 we also ship a Rule that says "If we discover a device and it has a valid SNMP OID, mark that device as managed by NMIS". Obviously you can disable this if it's not what you want.
To select devices to be integrated, we use nmis_manage = y, but you might like (for example) type = router. You can also use a Group or Query if you prefer something more complex.
Our default Integration also enables a discovery on any externally supplied devices. So we ship a default discovery for the Default Integration out of the box. These use the default matching rules, but also enable matching on IP address.
Speaking of Discoveries, as at 4.2.0 we also ship a subnet discovery for the subnet the Open-AudIT server is installed on - see the Release Notes for Open-AudIT v4.2.0.
Integrations can be scheduled as per Discoveries, Queries, et al.
Integration Attribute Explanation
Below are explanations for the attributes used by an Integration.
create_internal_from_external: When integrating devices from the external system, if the device doesn't exist in Open-AudIT should we create it?update_internal_from_external: When integrating devices from the external system, if the device has been updated in the external system should we update it in Open-AudIT?discovery_run: When retrieve an external device, should we run discovery upon it?
select_internal_type: How should we select devices to be integrated (using an Attribute, Query or a Group).select_internal_attribute: The attribute to test (from the 'system' table).select_internal_value: This item must match the value of the attribute selected.
create_external_from_internal: If an Open-AudIT device is not on the external system, should we create it.update_external_from_internal: If an Open-AudIT device has been changed, should we update the external system.delete_external_from_internal: If a remote device does not exist in the Open-AudIT selected devices, should we delete it from the remote system.
select_external_type: Which devices should Open-AudIT create from the remote system (if any). Using All, None or a given Attribute.select_external_attribute: The attribute to test (must match an external field name from below).select_external_value: This item must match the value of the attribute selected.
fields: A JSON array of objects, as below.
Fields
The fields associated with an Integration are stored in the database as a JSON array of objects. Each field has the following attributes:
internal_field_name: This should be the fully qualified field name in the database. Currently columns from the system, fields and credentials tables are supported. EG: system.nmis_role.
external_field_name: The fully qualified name returned by the external system. EG: for NMIS we use configuration.roleType.
priority: When combining devices, which system is the authoritative source for information.
default_value: If no value is present, supply this value. EG: for system.nmis_group / configuraion.group we use Open-AudIT.
matching_attribute: Should we use this value to match external and internal devices. Our default Integration uses IP and UUID here. If either of these match between external and internal device, we consider them to be the same device.
external_field_type: When we are converting an internally selected device to an object for the external system, what should the external data be. EG: integer, string, etc.
External Field Types
text: a text field
integer: a number
bool: true or false (in JSON context)
bool_one_zero: If the local field is true (bool) or y (string) or Y (string) or 1 (integer) then set the external data to 1.
bool_y_n: If the local field is true (bool) or y (string) or Y (string) or 1 (integer) then set the external data to y.
capitalize: Set the external text to capitalized version of the internal data.
lower: Set the external text to lowercase.
upper: Set the external text to uppercase.
datetime_now: The current date and time in the format "Y-m-d H:i:s".
datetime_Y-m-d H:i:s: The internal value, reformatted in this format.
date_now: The current date in "Y-m-d" format.
date_Y-m-d: The internal value, reformatted in this format.
date_m-d-Y: The internal value, reformatted in this format.
date_d-m-Y: The internal value, reformatted in this format.
NOTE - For more info on DateTime formats, see https://www.php.net/manual/en/datetime.createfromformat.php
Troubleshooting
After an Integration has been created, when you view the details of an Integration you will notice a field named Debug. This is set to no by default. Changing it to yes provides extra logging when an Integration is executed. Debug should not be left as yes. This is because the debug output will contain everything retrieved from external systems - including items such as WMI and SNMP credentials. The debug option should be used only when an issue has occurred and you wish to dig deeper in to see if you can determine why.
Screenshot Examples
Creating a new Integration (after clicking the Advanced button)
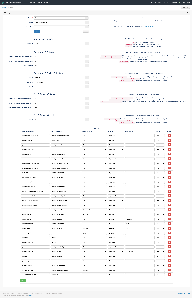
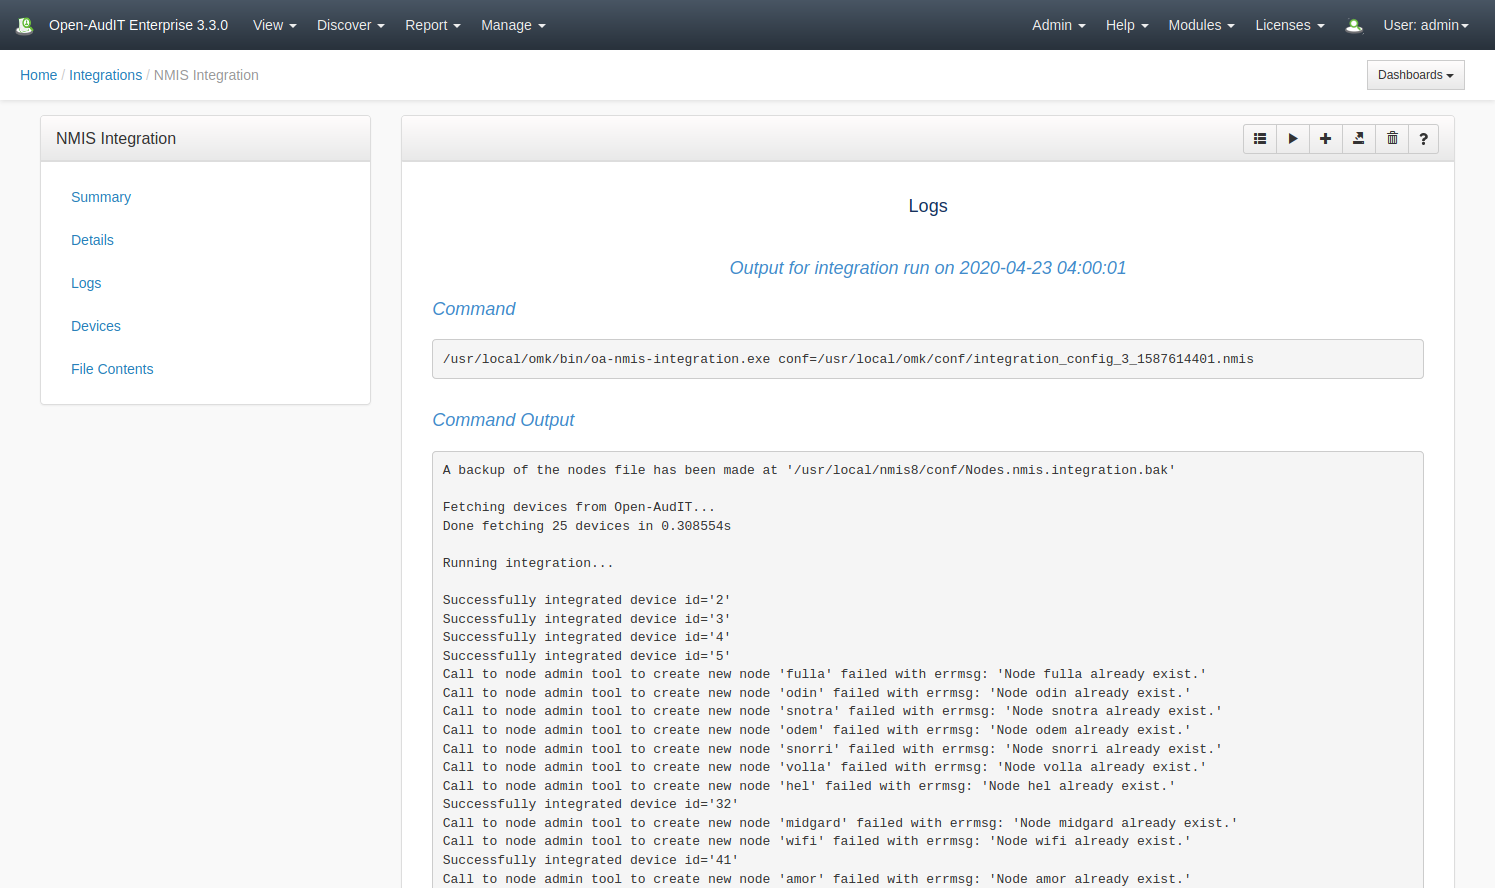
The logs from an Integration run
Database Schema
CREATE TABLE `integrations` (
  `id` int(10) unsigned NOT NULL AUTO_INCREMENT,
  `name` varchar(100) NOT NULL DEFAULT '',
  `org_id` int(10) unsigned NOT NULL DEFAULT '1',
  `description` text NOT NULL,
  `type` varchar(45) NOT NULL DEFAULT 'nmis',
  `additional_items` longtext NOT NULL,
  `attributes` longtext NOT NULL,
  `create_external_count` int(10) unsigned DEFAULT NULL,
  `create_external_from_internal` enum('y','n') NOT NULL DEFAULT 'n',
  `create_internal_count` int(10) unsigned DEFAULT NULL,
  `create_internal_from_external` enum('y','n') NOT NULL DEFAULT 'n',
  `devices` longtext NOT NULL,
  `locations` longtext NOT NULL,
  `debug` enum('y','n') NOT NULL DEFAULT 'n',
  `discovery_id` int(10) unsigned DEFAULT NULL,
  `discovery_run` enum('y','n') NOT NULL DEFAULT 'n',
  `fields` longtext NOT NULL,
  `select_external_attribute` varchar(200) NOT NULL DEFAULT '',
  `select_external_count` int(10) unsigned DEFAULT NULL,
  `select_external_type` enum('','all','none','attribute') DEFAULT 'all',
  `select_external_value` varchar(200) NOT NULL DEFAULT '',
  `select_internal_attribute` varchar(200) NOT NULL DEFAULT '',
  `select_internal_count` int(10) unsigned DEFAULT NULL,
  `select_internal_type` enum('','none','attribute','group','query') DEFAULT 'attribute',
  `select_internal_value` varchar(200) NOT NULL DEFAULT '',
  `update_external_count` int(10) unsigned DEFAULT NULL,
  `update_external_from_internal` enum('y','n') NOT NULL DEFAULT 'y',
  `update_internal_count` int(10) unsigned DEFAULT NULL,
  `update_internal_from_external` enum('y','n') NOT NULL DEFAULT 'y',
  `delete_external_from_internal` enum('y','n') NOT NULL DEFAULT 'n',
  `status` varchar(200) NOT NULL DEFAULT '',
  `last_run` datetime NOT NULL DEFAULT '2000-01-01 00:00:00',
  `duration` int(10) unsigned DEFAULT NULL,
  `edited_by` varchar(200) NOT NULL DEFAULT '',
  `edited_date` datetime NOT NULL DEFAULT '2000-01-01 00:00:00',
  PRIMARY KEY (`id`)
) ENGINE=InnoDB DEFAULT CHARSET=utf8;


CREATE TABLE `integrations_log` (
  `id` int(10) unsigned NOT NULL AUTO_INCREMENT,
  `integrations_id` int(10) unsigned DEFAULT NULL,
  `timestamp` timestamp NOT NULL DEFAULT CURRENT_TIMESTAMP,
  `microtime` decimal(16,6) DEFAULT NULL,
  `severity_text` enum('debug','info','notice','warning','error','critical','alert','emergency') NOT NULL DEFAULT 'notice',
  `message` text NOT NULL,
  PRIMARY KEY (`id`)
) ENGINE=InnoDB DEFAULT CHARSET=utf8;
Pre Open-AudIT 4.2.0
Introduction
The Integrations endpoint allows you to define an integration which you can then use to import and export Open-AudIT data to an external system. At present the single supported Integration type is "nmis".
Integrations are a Professional and Enterprise feature.
Integrations are being introduced in Open-AudIT 3.1.0 with a view to expand on the concept as further development is made.
Prerequisite
To run an Integration, you will need to download the oa-nmis-integration.exe (this is a Linux binary) and place it in /usr/local/omk/bin
The binary is available here - https://dl-openaudit.opmantek.com/oa-nmis-integration.exe
Please ensure it is executable by running the below.
chmod +x /usr/local/omk/bin/oa-nmis-integraion.exe
This file will be included in future releases of Open-AudIT for Linux.
How Does it Work?
You can define an integration and use it to export Open-AudIT devices to NMIS. By default only devices with their nmis_manage attribute set to 'y' will be exported. This is completely customizable.
For a more detailed view, see OpenAudIT-NMIS Integration.
Integrations can be scheduled like other tasks. First define your Integration, then create the task and select integration from the type drop down.
Set Devices to be Managed
By default, only devices with their "nmis_manage" attribute set to y' will be exported to NMIS. You can use the Bulk Edit functionality within Open-AudIT to quickly set the "Manage in NMIS" attribute on only the devices you need. You can also set individual devices to be managed on the device details screen. Select the Opmantek Details menu item from the left side edit the "Manage in NMIS" field.
You can also set the other fields to be sent to NMIS as you desire, either individually or using Bulk Edit.
Check Device List
Once you have set the attribute on your selected devices, you can run the default integration query to ensure the resulting device list is as you expect. Go to menu → Report → Other → Integration Default for NMIS. An integration entry can be created using the web interface if the current user logged in has a role that contains the integrations::create permission. Go to menu: Manage -> Integrations -> Create Integrations. Provide a name for the Integration, select an Org and provide your credentials. By default all devices with their nmis_manage attribute will be selected for the Integration. If you would like another selection of devices, click the Advanced button and select a different query to be used to select your device list. You can create a custom query the same as you do any other regular queries, see Queries.Creating an Integration
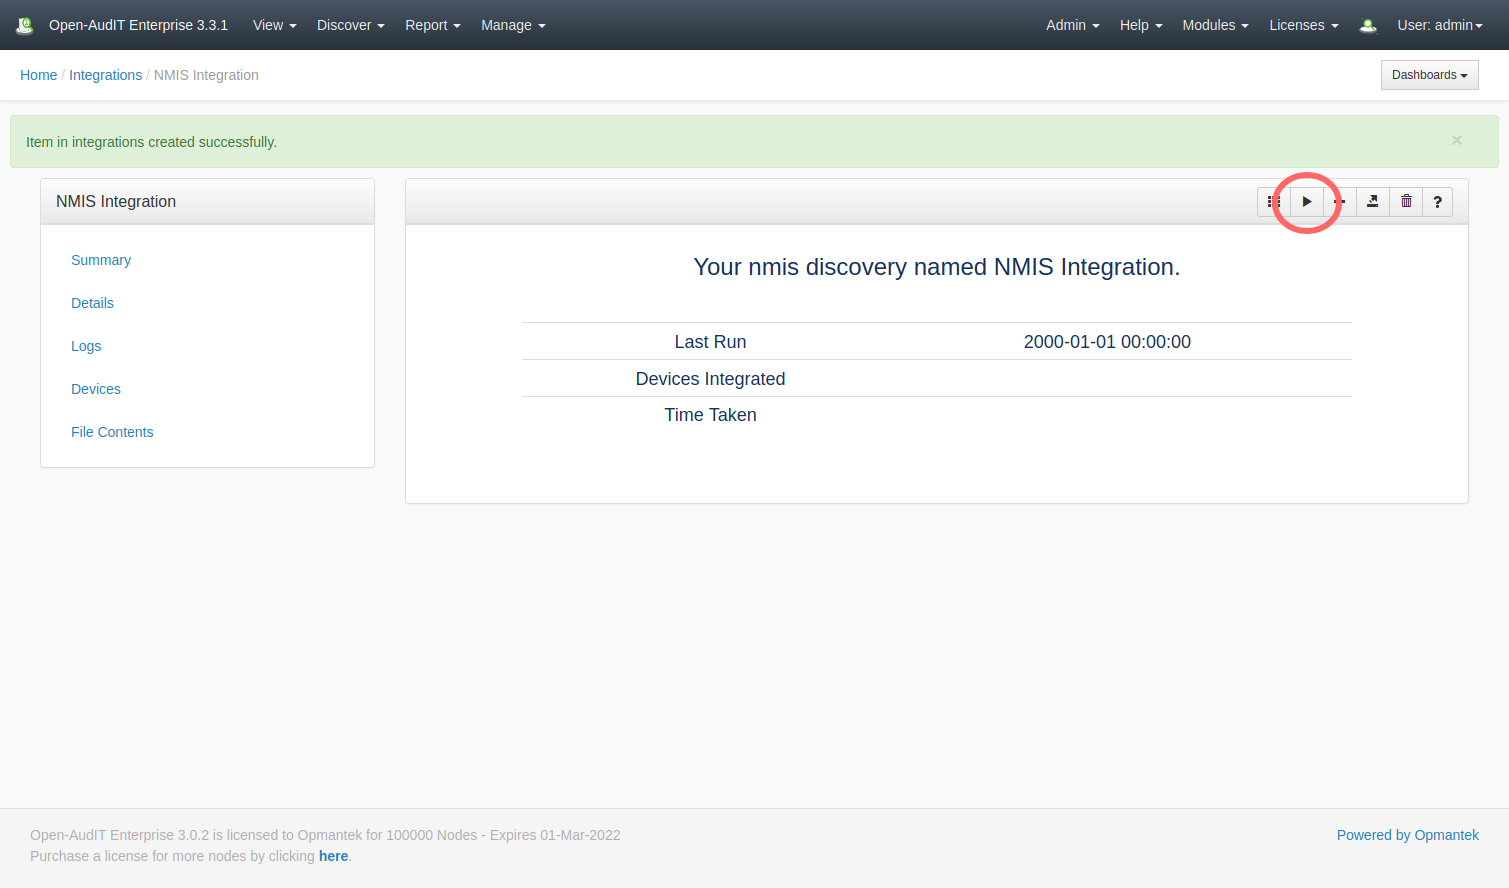
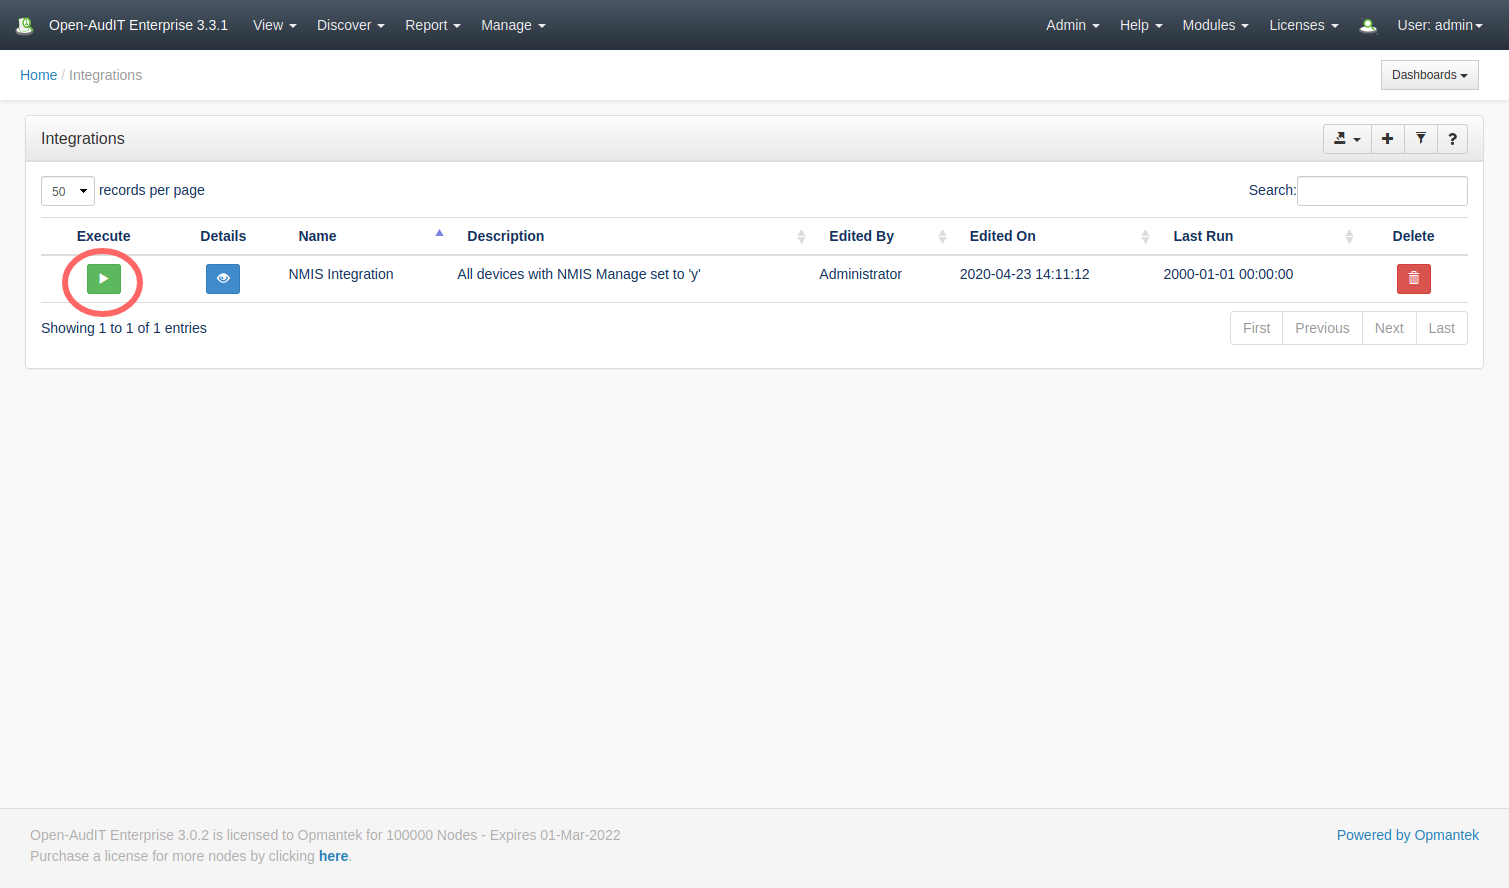
After creating the integration entry you should be on that integrations entry details page. In the panel header on the upper right of the page is a group of buttons. The button that looks like an old fashioned "play" icon (a triangle) will execute this integration. If you're on the Integrations list page, on the left side is a green triangle, the same icon as on the details page. Click that and the Integration will be executed. You should shortly see the logs from the executing integration (you may have to click your browsers 'refresh' button to see the updated logs). Your selected devices will be imported into NMIS, including their credentials. They will be assigned to the Open-AudIT group within NMIS. This is configurable on a per devices basis, see How to Bulk Edit device attributes for more information. You can also use Tasks to schedule an Integration to run whenever you need it to. Once the devices have been exported to NMIS, after NMIS has run a collect / poll cycle, the relevant data within NMIS should appear.Executing an Integration
View Integrations Details
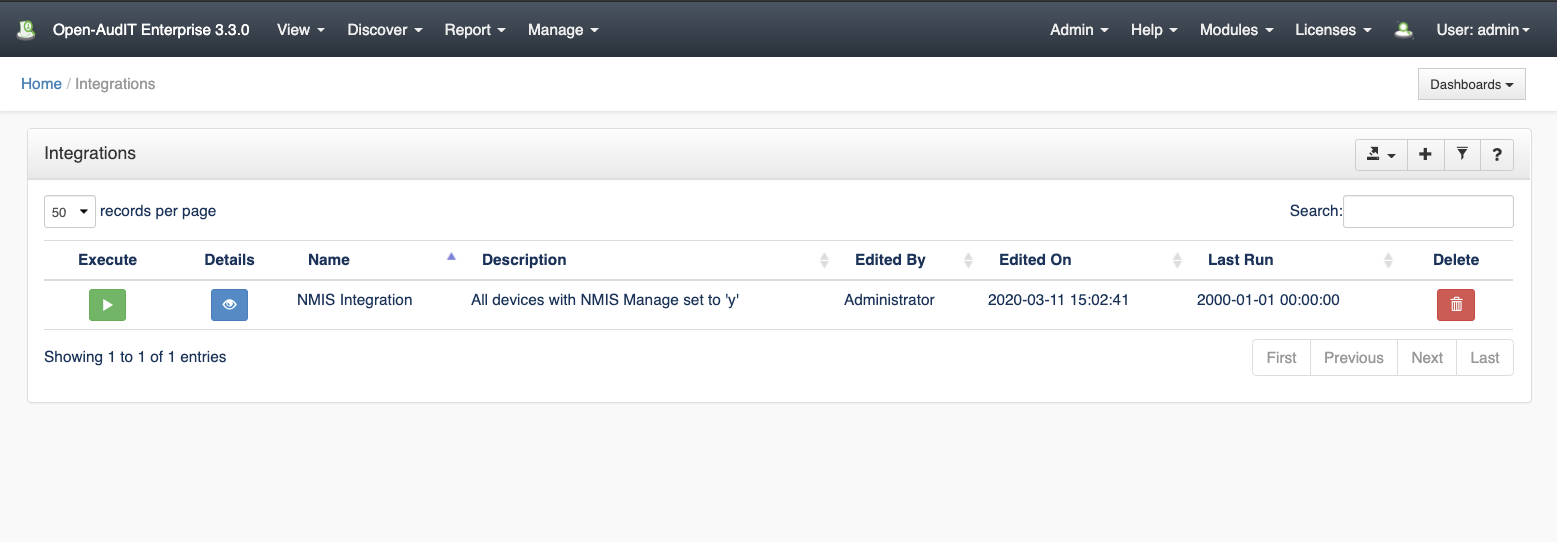
Go to menu: Manage-> Integrations -> List Integrations.
You will see a list of integrations. You can view an integration by clicking on the blue view icon. You can also edit or delete Integrations.
Database Schema
The database schema can be found in the application is the user has database::read permission by going to menu: Admin -> Database -> List Tables, then clicking on the details button for the table.
API / Web Access
You can access the collection using the normal Open-AudIT JSON based API. Just like any other collection. Please see The Open-AudIT API documentation for further details.